


Graphing Volume: A Fun Decibel-Meter Activity for Preschoolers
Table Of Contents
- Why Sound Exploration Matters in Early Childhood
- What Is a Decibel? Making Science Simple for Little Learners
- Developmental Benefits of Volume Graphing Activities
- What You’ll Need for Your Decibel-Meter Activity
- Step-by-Step: Conducting Your Volume Graphing Activity
- Choosing Age-Appropriate Sound Sources
- Creating Visual Graphs with Preschoolers
- Extension Activities to Deepen Learning
- Safety and Hearing Protection Guidelines
- Connecting Volume Activities to Your Music Curriculum
Imagine a classroom where preschoolers eagerly gather around as you whisper, then speak normally, then play a musical instrument—each time watching in fascination as numbers change on a device and colorful bars grow taller on a chart. This is the magic of a decibel-meter graphing activity, where abstract concepts like volume and measurement become tangible, interactive experiences that captivate young minds.
Sound exploration forms a natural bridge between music education and early science learning, making it an ideal vehicle for introducing foundational concepts in mathematics, data collection, and scientific observation. When children graph the volume of different sounds using a decibel meter, they’re not just learning about loud and quiet—they’re developing critical thinking skills, mathematical reasoning, and sensory awareness that will serve them throughout their educational journey.
At The Music Scientist, we’ve witnessed how integrating hands-on sound activities with visual representation creates powerful learning moments that engage multiple intelligences simultaneously. This comprehensive guide will walk you through creating an engaging, developmentally appropriate decibel-meter activity that transforms your preschoolers into enthusiastic young scientists while building essential school-readiness skills.
Graphing Volume with Preschoolers
Transform sound exploration into hands-on learning adventures
🎵 Why This Activity Matters
Multi-Sensory Learning
Combines auditory, visual, and kinesthetic experiences for deeper understanding
STEM Foundation
Introduces scientific processes: predict, test, collect data, and conclude
School Readiness
Builds math, language, and critical thinking skills simultaneously
📊 Understanding Decibel Levels
30 dB
Whisper
Very quiet sounds – perfect for starting comparisons
60 dB
Normal Conversation
Typical classroom talking volume
80-85 dB
Musical Instruments
Safe maximum for preschool activities
🎯 5 Steps to Success
1
Introduce & Demonstrate
Show the decibel meter as a “listening tool” – demonstrate quiet vs. loud sounds
2
Make Predictions
Ask children which sounds will be loudest – record their guesses on chart paper
3
Conduct Sound Tests
Test 3-5 sound sources one at a time – let children take turns creating sounds
4
Record Results
Build bar graphs using blocks, stickers, or coloring – make data visible and tangible
5
Analyze & Discuss
Compare predictions to results – ask open-ended questions about observations
🧰 Simple Materials Needed
📱
Decibel meter or sound app
🥁
Musical instruments & objects
📊
Chart paper & markers
🧱
Blocks or stickers for graphing
🌟 Developmental Benefits
✓ Mathematical Thinking
✓ Scientific Literacy
✓ Language Development
✓ Fine Motor Skills
✓ Auditory Discrimination
✓ Executive Function
⚠️ Safety First
Always keep sounds below 85 dB
Protect young ears by monitoring volume levels throughout the activity. Provide ear protection for sensitive children and build in quiet rest periods.
🎵 Transform sound into learning adventures!
This hands-on activity builds multiple intelligences while preparing preschoolers
for successful transitions into formal education.
Why Sound Exploration Matters in Early Childhood
Sound is one of the first sensory experiences children engage with, even before birth. By the time they reach preschool age, children have already accumulated thousands of auditory experiences, yet they often lack the vocabulary and conceptual framework to categorize and understand these experiences systematically. Sound exploration activities fill this gap by giving children tools to observe, compare, and communicate about the acoustic world around them.
When we introduce structured sound activities during the preschool years, we’re capitalizing on a critical window for auditory development and sensory integration. Research in early childhood education consistently shows that multi-sensory learning experiences—those that combine auditory, visual, and kinesthetic elements—create stronger neural pathways and deeper understanding than single-modality instruction. A decibel-meter graphing activity exemplifies this approach by asking children to listen (auditory), watch the meter and create graphs (visual), and manipulate instruments or objects to create sounds (kinesthetic).
Beyond sensory development, sound activities introduce children to fundamental scientific processes: making predictions, conducting experiments, collecting data, and drawing conclusions. These inquiry-based learning skills form the foundation for STEM education and critical thinking across all subject areas. When a four-year-old predicts that banging a drum will create a “bigger number” than shaking a maraca, then tests this hypothesis and records the results, they’re engaging in authentic scientific practice at a developmentally appropriate level.
What Is a Decibel? Making Science Simple for Little Learners
Before diving into the activity itself, it’s helpful to understand what decibels measure and how to explain this concept to young children. A decibel (dB) is a unit that measures the intensity or loudness of sound. While the technical definition involves logarithmic scales and sound pressure levels, preschoolers need only grasp the basic concept: bigger numbers mean louder sounds, smaller numbers mean quieter sounds.
For preschool audiences, we can introduce decibels as “sound numbers” or “loudness numbers.” You might explain: “This special tool listens to sounds and gives them numbers. When sounds are very quiet, like a whisper, the number is small. When sounds are loud, like a drum, the number is big!” This simplified explanation provides enough context for children to engage meaningfully with the activity without overwhelming them with technical details.
It’s worth noting that typical conversation occurs at around 60 dB, a whisper at about 30 dB, and a child’s shout can reach 80-90 dB. Musical instruments in a preschool setting typically range from 50-85 dB depending on how they’re played. Understanding these benchmarks helps educators select appropriate sound sources and establish safe volume limits for the activity.
Developmental Benefits of Volume Graphing Activities
Graphing volume with a decibel meter offers a remarkably rich constellation of developmental benefits that align perfectly with early learning standards and preschool readiness competencies. This single activity touches on multiple domains of development simultaneously, making it an efficient and effective use of instructional time.
Mathematical thinking develops as children encounter concepts like measurement, comparison, greater than/less than, and one-to-one correspondence when creating bar graphs. They learn that numbers represent quantities and that these quantities can be compared and ordered—foundational concepts for future arithmetic. Even the act of counting blocks or coloring squares to represent decibel readings reinforces number recognition and counting skills.
Scientific literacy emerges through the inquiry process itself. Children form hypotheses (“I think the big drum will be louder than the small bell”), test these predictions, observe results, and draw conclusions. They learn that tools can help us measure things our senses alone cannot quantify precisely. This introduction to data-driven reasoning plants seeds for future scientific thinking across all disciplines, from physics to social sciences.
Language development flourishes as children acquire and use comparative vocabulary—loud, quiet, louder, quietest, softer, volume, sound, measure. They practice describing their observations, explaining their predictions, and discussing results with peers. This specialized vocabulary builds on the verbal learning experiences emphasized in programs like our Scouts programme, where catchy melodies help cement new concepts and terminology.
Fine motor skills and hand-eye coordination strengthen as children manipulate instruments, hold the decibel meter, and create visual graphs by coloring, stacking, or placing manipulatives. Auditory discrimination—the ability to detect differences in sounds—becomes more refined as children learn to listen carefully and predict volume outcomes. Meanwhile, executive function skills like focus, working memory, and self-regulation develop as children follow multi-step instructions, wait for their turn, and remember predictions while conducting experiments.
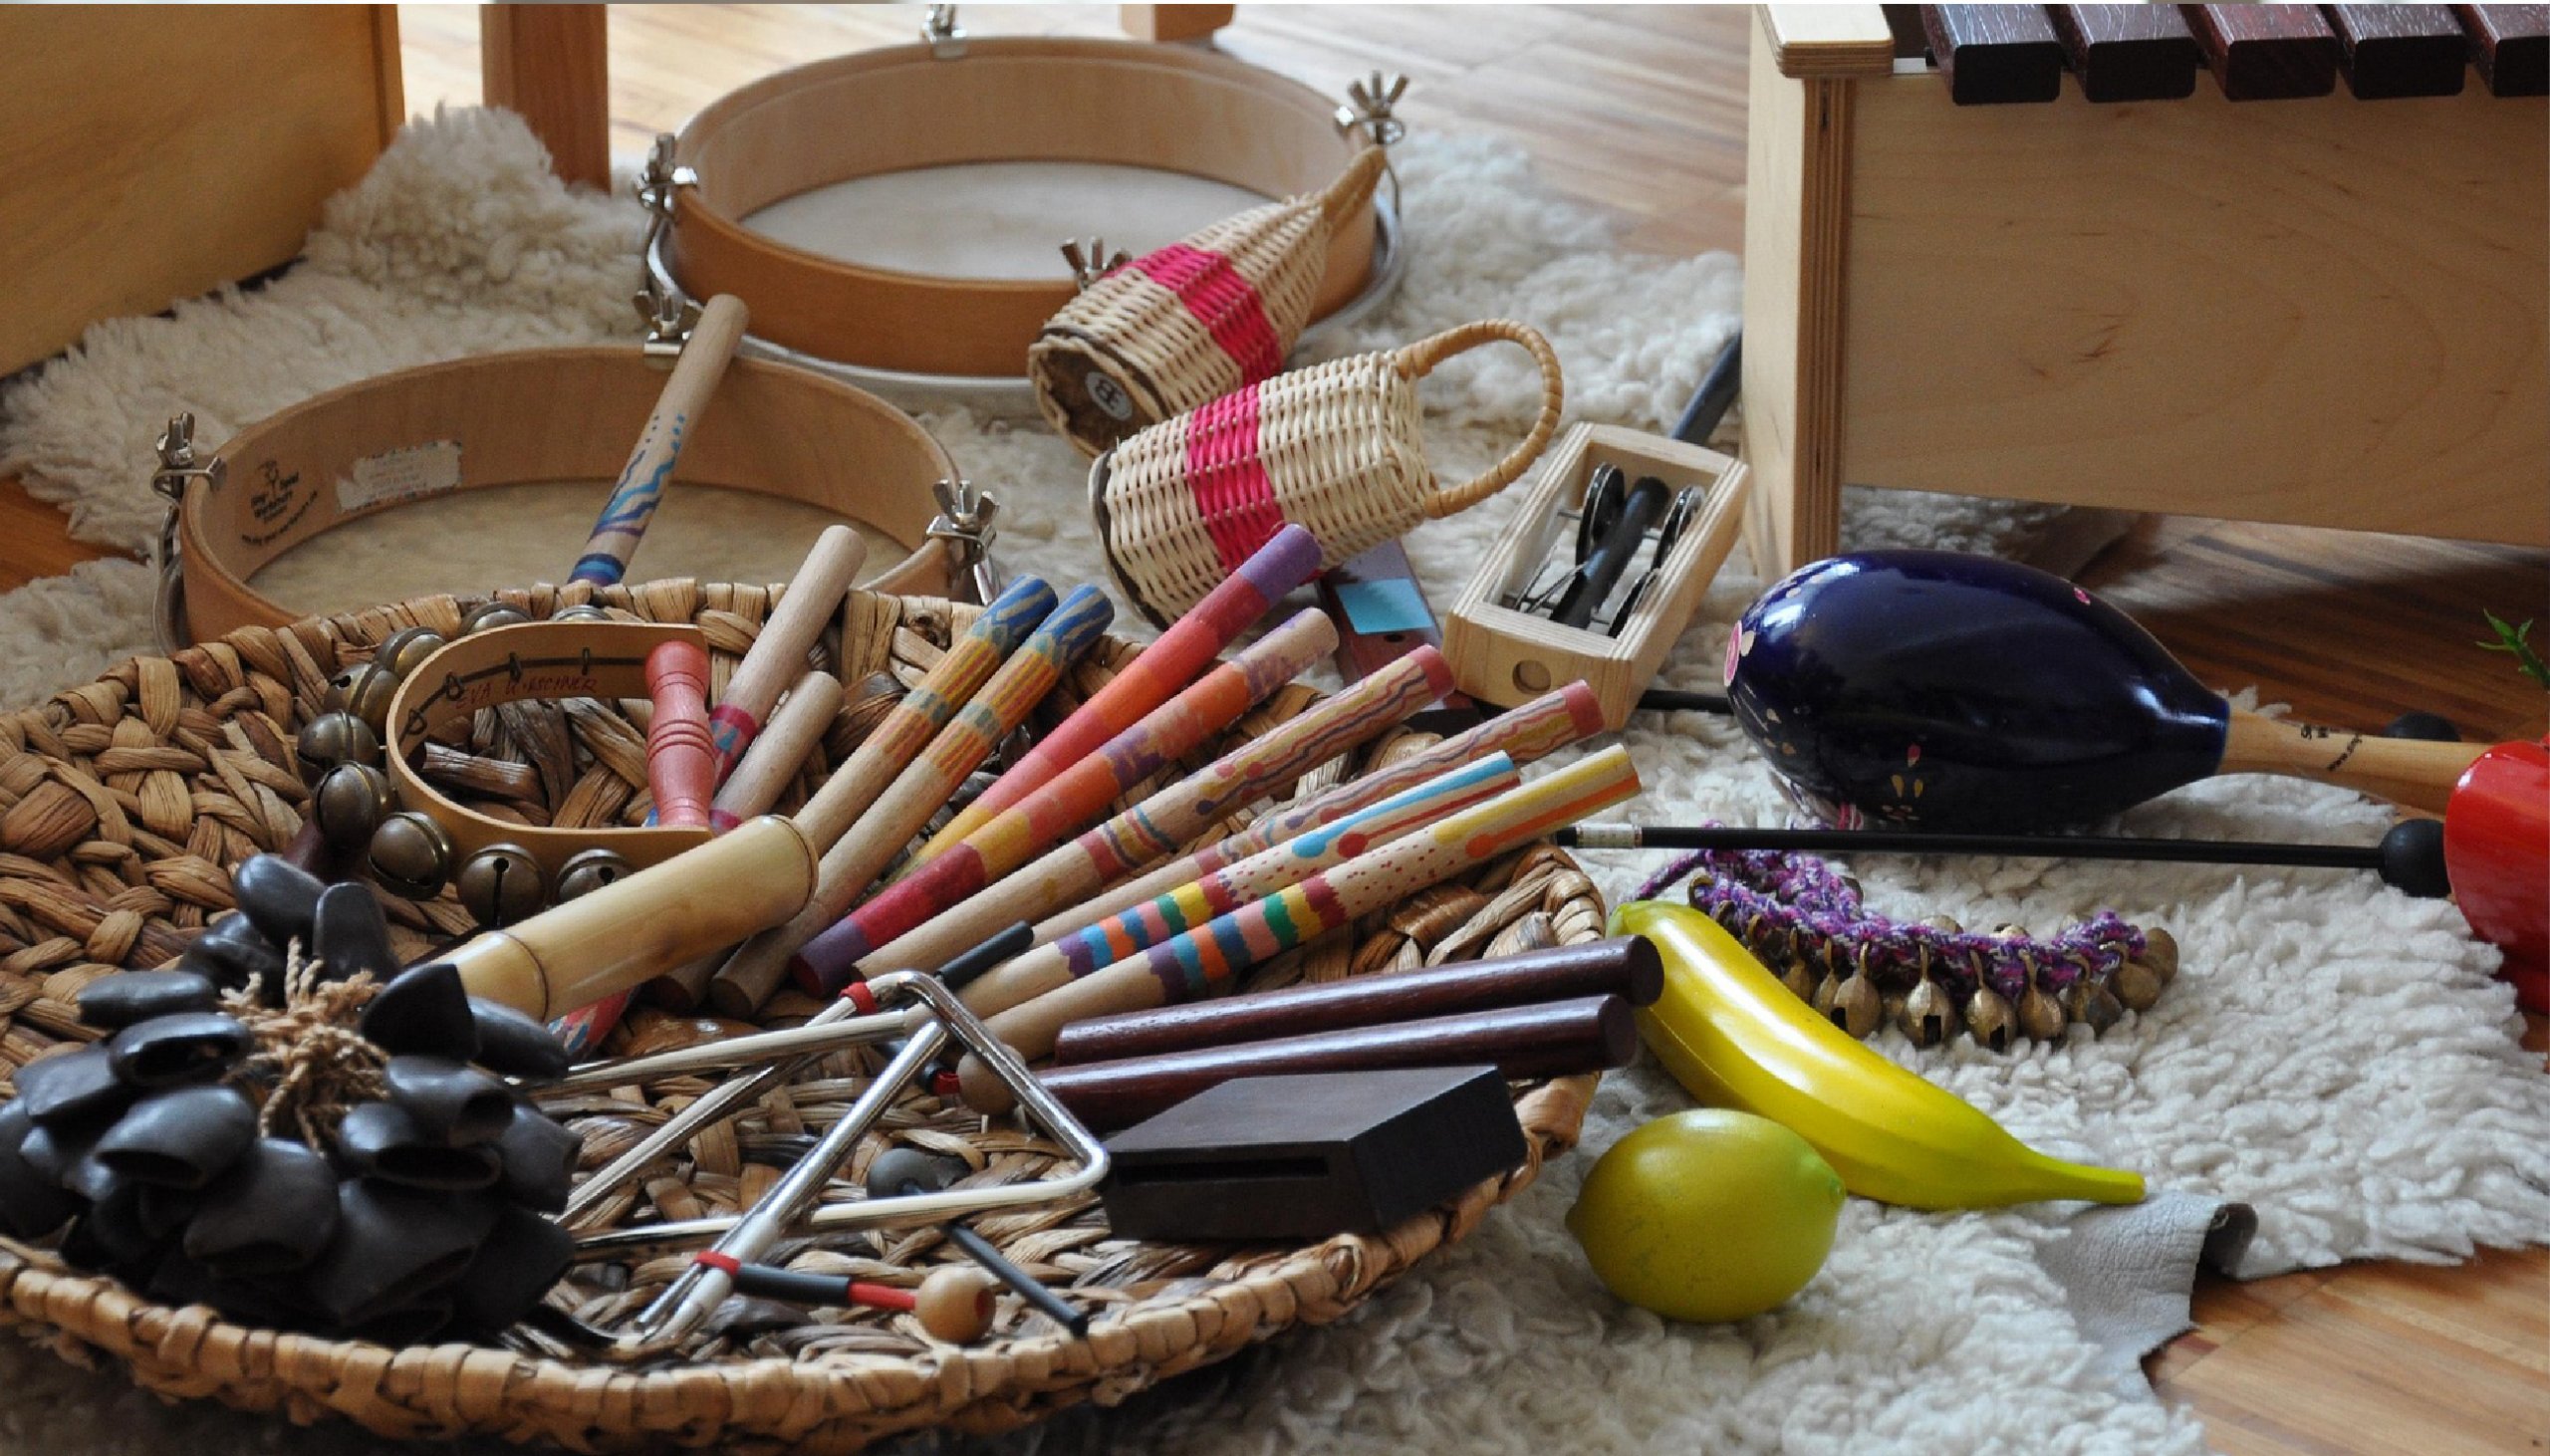
What You’ll Need for Your Decibel-Meter Activity
One of the appealing aspects of this activity is its simplicity—you don’t need expensive equipment or extensive preparation. With a few basic materials, you can create a powerful learning experience that children will want to repeat again and again.
- Decibel meter or sound level app: Affordable digital decibel meters are available for $20-30, or you can use free smartphone apps like “Decibel X,” “Sound Meter,” or “Too Noisy” (note that apps are less accurate but sufficient for preschool exploration)
- Variety of sound sources: Musical instruments (drums, shakers, bells, xylophones), everyday objects (whisper, clap, book closing, paper crumpling), recorded sounds (animal sounds, nature sounds, music)
- Graphing materials: Large poster board or chart paper, colored markers or crayons, stickers or colored blocks for creating bar graphs, pre-printed graph templates (optional)
- Visual aids: Pictures or actual objects representing each sound source to help pre-readers identify categories
- Recording sheets: Simple data collection sheets where children can mark or draw their observations
- Optional enhancements: Camera or tablet for documenting the process, laminated graphs for repeated use with dry-erase markers, headphones or ear protection for sensitive children
When selecting your decibel meter, prioritize ease of reading over technical precision. Look for models with large, clear digital displays that update quickly. The most expensive laboratory-grade equipment isn’t necessary—preschoolers benefit more from immediate visual feedback than from measurements accurate to the tenth of a decibel.
Step-by-Step: Conducting Your Volume Graphing Activity
This activity works beautifully in both small group settings and whole-class configurations, though small groups of 4-6 children allow for more individual participation and deeper engagement. Plan for 20-30 minutes for the complete activity, though you can extend this across multiple sessions to prevent cognitive overload and maintain engagement.
1. Introduction and Demonstration (5 minutes) – Begin by gathering children in a circle and introducing the decibel meter as a “special listening tool” that gives numbers to sounds. Demonstrate by producing a very quiet sound (whisper) and showing the low number, then a louder sound (clap) and showing the higher number. Ask children what they notice about the relationship between the sound and the numbers. This initial demonstration builds anticipation and establishes the basic concept before hands-on exploration begins.
2. Make Predictions (3-5 minutes) – Show children the 3-5 sound sources you’ll be testing (keep the number manageable for this age group). Ask them to predict which will be loudest, which will be quietest, and how they might order from softest to loudest. Record these predictions on chart paper—this creates investment in the outcome and provides an opportunity later to compare predictions with actual results, a key component of scientific thinking.
3. Conduct Sound Tests (10-15 minutes) – Test each sound source one at a time, allowing different children to create the sound while others observe the decibel meter. Read the number aloud and repeat it several times so children can process and remember it. For consistency, try to produce each sound at a similar intensity across trials. If possible, allow children to test each sound multiple times to see if results are consistent—this introduces the concept of repeated trials and reliability in scientific investigation.
4. Record Results (5-10 minutes) – As you test each sound, immediately transfer the data to a visual graph. You might create a bar graph where each sound source has a column, and children help color or stack blocks to represent the decibel reading. Alternatively, use stickers, stamps, or manipulatives to build the graph collaboratively. Narrate what you’re doing: “The drum measured 75, so we’ll color 75 squares in the drum column. That’s much taller than the whisper column, which only has 28 squares!”
5. Analyze and Discuss (5 minutes) – Once all sounds are tested and graphed, gather children to examine the completed visual. Ask open-ended questions: “What do you notice about our graph? Which sound was loudest? Were our predictions correct? Why do you think the drum was louder than the bell?” This reflection period consolidates learning and develops critical thinking skills. Children often make insightful observations about the relationship between object size, material, or playing method and resulting volume.
Choosing Age-Appropriate Sound Sources
The sound sources you select significantly impact both the educational value and the success of this activity. The goal is to choose sounds that produce clearly different decibel readings while remaining within safe hearing ranges for young children and offering enough variety to make comparisons meaningful and interesting.
For beginners or younger preschoolers (ages 3-4), start with dramatic contrasts: a whisper versus a drum, a gentle rainstick versus a loud tambourine. These obvious differences make the relationship between sound intensity and decibel readings immediately apparent, building children’s confidence in their observational abilities. As children gain experience with the activity, you can introduce more subtle variations that require closer listening and more careful observation of the meter.
Consider organizing sound sources by category to add an additional layer of learning. You might compare instrument families (percussion vs. wind vs. string), playing methods (gentle vs. forceful), everyday sounds (footsteps, door closing, water running, paper tearing), or vocal sounds (whisper, speaking voice, singing voice, shouting). Each categorization offers different insights and vocabulary development opportunities.
The musical foundation children develop through activities like our Groovers classes prepares them beautifully for this type of sound exploration. Children who have experience with various instruments through structured music education already possess some intuitive understanding of volume variation and are often more confident manipulating instruments to produce specific sound qualities.
Recommended Sound Sources by Volume Range
- Quiet sounds (30-50 dB): Whisper, turning pages, pencil writing, soft finger snaps, gentle rainstick, tissue paper crumpling
- Medium sounds (50-70 dB): Normal conversation, hand claps, small bells, shakers, gentle xylophone playing, book closing
- Louder sounds (70-85 dB): Singing voice, tambourine, drum played with moderate force, whistle, recorded music at moderate volume
Always avoid sounds exceeding 85 dB in preschool settings, as repeated exposure to sounds at this level can damage developing hearing. If a sound source unexpectedly registers above 85 dB on your meter, reduce the intensity or eliminate that source from your activity.
Creating Visual Graphs with Preschoolers
The graphing component of this activity transforms abstract numbers into concrete, visual representations that preschoolers can interpret and understand. The key to successful graphing with young children lies in using physical, manipulative materials before transitioning to drawn representations—this honors their developmental stage and builds conceptual understanding from concrete to abstract.
For the most accessible approach, create a large floor or table graph where children can place actual objects in columns. Use tape to mark columns on the floor, label each column with a picture of the sound source, and provide unifix cubes, blocks, or other stackable items. As you measure each sound, children help build a tower in that column corresponding to the decibel reading. This three-dimensional graph allows children to physically experience the differences in height and provides opportunities for direct comparison—they can stand towers next to each other, count the blocks in each, or even knock them down and rebuild them to verify the count.
An intermediate approach uses large chart paper with pre-drawn columns (about 4-6 inches wide) and horizontal lines marking increments of 5 or 10 decibels. Children use large stickers, stampers, or colored blocks that they glue onto the chart to build the bar graph. This method creates a permanent record you can display in the classroom and refer back to during future discussions, reinforcing the concepts over time.
For older preschoolers or those with more graphing experience, individual recording sheets work well. Create simple templates with pictures of each sound source along the bottom and numbers along the side. Children color squares or draw marks to represent each decibel reading. This approach develops fine motor skills and personal responsibility for data recording, though it requires more adult support to ensure accuracy.
Regardless of which method you choose, the graphing process should be collaborative and narrated. Think aloud as you work: “The drum measured 78 decibels. Let’s count together as we stack blocks—10, 20, 30, 40, 50, 60, 70… we need eight more to get to 78. Look how tall this tower is compared to the whisper tower!” This running commentary makes your mathematical thinking visible and provides language models for children.
Extension Activities to Deepen Learning
Once children have mastered the basic decibel-graphing activity, numerous extensions can challenge their thinking, introduce new concepts, or connect sound exploration to other areas of learning. These extensions allow you to differentiate instruction and maintain engagement across multiple sessions.
Distance and volume investigation: Test how distance affects volume by measuring the same sound source (like a bell) at different distances from the microphone—right next to it, one foot away, across the room. Graph these results and discuss what happens to sound as it travels. This introduces the concept that sound waves spread out and decrease in intensity over distance.
Materials exploration: Compare how different materials affect sound by tapping the same object (a stick) against various surfaces—metal, wood, fabric, plastic. Measure and graph the resulting decibel readings. Children often express surprise that the same action produces different volumes depending on the material, opening conversations about absorption and reflection of sound.
Musical dynamics activity: If children have music education experience, such as through our SMART-START English programme, connect this activity to musical concepts of dynamics. Play an instrument or recorded music at piano (soft), mezzo-forte (medium), and forte (loud) volumes, measuring and graphing each. Introduce the formal musical vocabulary alongside the scientific measurements.
Body sounds comparison: Explore the volume of different body-produced sounds—finger snaps, hand claps, foot stomps, tongue clicks, humming, singing. This extension requires no materials beyond the decibel meter and helps children recognize their own bodies as sound-producing instruments, connecting nicely to kinesthetic learning styles.
Environmental sound investigation: Take the decibel meter on a sound walk around your school or center, measuring sounds in different locations—the classroom, playground, cafeteria, hallway, outdoor space. Create a graph comparing these different environments and discuss why some spaces are naturally louder than others. This real-world application helps children understand sound in their everyday context.
Sound story creation: After graphing various sounds, create a simple story that incorporates them in order from quietest to loudest or vice versa. Children can act out the story using the actual sound sources, combining literacy development with sound science. This narrative approach particularly supports verbal-linguistic intelligence and helps children remember concepts through storytelling.
Safety and Hearing Protection Guidelines
While sound exploration activities are generally safe for preschoolers, educators must remain mindful of hearing protection and establish clear boundaries around acceptable volume levels. Young children’s hearing is more sensitive than adults’, and damage from loud sounds is cumulative and often irreversible.
Establish a firm rule that all sounds in your activity must measure below 85 dB, the threshold at which sustained exposure can cause hearing damage. If testing a sound source produces a reading above this level, immediately reduce the intensity or eliminate that source from the activity. Teach children that when we conduct sound experiments, we never create sounds that could hurt our ears or others’ ears—this integrates safety education naturally into the scientific process.
Create a “safe listening” culture in your classroom by modeling appropriate volume levels and praising children when they use gentle touches or moderate force with instruments. You might introduce a visual signal (like a hand-raising gesture) that means “too loud” and practice having children reduce volume when they see the signal. This self-regulation skill extends beyond this particular activity and supports classroom management throughout the day.
For children with sensory sensitivities or hearing challenges, provide accommodations such as noise-canceling headphones they can wear during the loudest parts of the activity, a quiet space where they can observe without being in the immediate vicinity of sound production, or the option to cover their ears during louder sounds. Some children may prefer to help with graphing or recording rather than creating sounds themselves—honor these preferences while gently encouraging participation at comfortable levels.
Remember that repeated exposure matters more than single instances. While one loud sound is unlikely to cause damage, subjecting children to loud sounds repeatedly throughout an extended activity session can be harmful. If you’re conducting multiple rounds of testing or allowing children to explore freely with instruments and the decibel meter, monitor the overall sound environment and build in quiet periods to give everyone’s ears a rest.
Connecting Volume Activities to Your Music Curriculum
Decibel-meter graphing activities integrate beautifully into comprehensive music education programs, especially those that emphasize the scientific properties of sound alongside musical expression. At The Music Scientist, we believe that understanding the mechanics of sound—how it’s created, how it travels, how we perceive different qualities—enhances children’s musical development and deepens their appreciation for music as both an art and a science.
This activity aligns particularly well with curricula that explore the fundamental elements of music: dynamics (loud and soft), timbre (quality of sound), and pitch (though pitch exploration requires different tools). When children understand that dynamics can be measured and quantified, not just felt subjectively, they develop more precise control over their own musical expression. A child who has experimented with how forcefully they must strike a drum to produce 60 dB versus 80 dB gains practical understanding of how to moderate their playing to achieve desired musical effects.
For programs like our Happyfeet classes, which focus on toddlers’ emerging abilities, simplified versions of this activity introduce the foundational concept that sounds have measurable qualities. Even 18-month-olds can grasp that the meter’s numbers get bigger when sounds get louder, planting seeds for future mathematical and scientific thinking.
The interdisciplinary nature of this activity also supports holistic development across domains. Children simultaneously engage their logical-mathematical intelligence (measuring, comparing, graphing), musical intelligence (creating and discriminating sounds), kinesthetic intelligence (manipulating instruments), and verbal-linguistic intelligence (describing observations). This multi-intelligence approach mirrors The Music Scientist’s philosophy that early childhood education should address the whole child, not isolated skills.
Consider documenting your decibel activities with photos and saving the graphs children create. These artifacts provide concrete evidence of learning that you can share with families and reference in future lessons. You might create a “sound scientists” bulletin board showcasing children’s investigations, or compile their graphs into a class book about sound exploration. These tangible products help children see themselves as capable learners and scientists, building confidence and identity as curious investigators of their world.
As you integrate sound measurement into your regular curriculum, you’ll likely notice children beginning to apply this vocabulary and these concepts spontaneously. They might comment that the vacuum cleaner in the hallway is “probably 80 decibels” or wonder if a whisper is “less than 30.” These unprompted connections indicate that children are truly internalizing the concepts and incorporating them into their understanding of everyday experiences—the ultimate goal of any educational activity.
Graphing volume with a decibel meter transforms abstract concepts into concrete, memorable learning experiences that engage preschoolers’ natural curiosity about the world of sound. Through this hands-on activity, children develop foundational skills in mathematics, science, language, and self-regulation while building their understanding of music and acoustics in developmentally appropriate ways.
The beauty of this activity lies in its scalability and adaptability—you can conduct it with minimal materials and preparation, yet extend it in countless directions based on children’s interests and abilities. Whether you’re introducing the concept for the first time with dramatic volume contrasts or challenging experienced learners to investigate how materials and distance affect sound intensity, the core experience of measuring, comparing, and graphing remains engaging and educationally rich.
Most importantly, activities like these cultivate a scientific mindset that will serve children throughout their educational journey. When preschoolers learn to observe carefully, make predictions, test hypotheses, and analyze results, they’re developing thinking patterns that transcend any single subject area. They’re learning to approach the world with curiosity, rigor, and confidence—skills that matter far more than any individual fact they might memorize.
At The Music Scientist, we’re passionate about creating learning experiences that honor children’s developmental needs while introducing them to big ideas through the powerful medium of music and sound. Activities that bridge science, mathematics, and music exemplify our commitment to holistic, engaging education that prepares children not just for school, but for a lifetime of joyful learning.
Ready to Explore Music and Science with Your Child?
At The Music Scientist, we combine music, movement, and hands-on exploration to nurture young minds and build essential school-readiness skills. Our developmentally focused programs for babies, toddlers, and preschoolers create joyful learning experiences that develop multiple intelligences simultaneously.
From our Tenderfeet infant care classes to our comprehensive SMART-START programmes, we offer engaging curricula that make learning irresistible.
Contact us today to discover how music can unlock your child’s potential and prepare them for a successful transition to formal education.
Table Of Contents
- Why Rubber-Band Guitars Make Perfect Learning Tools
- The Science Behind Sound Frequencies
- What You’ll Need to Build Your Guitar
- Step-by-Step: Building Your Rubber-Band Guitar
- Exploring Frequencies Through Play
- Developmental Benefits for Young Learners
- Adapting the Activity for Different Ages
- Extension Activities to Deepen Learning
There’s something magical about the moment a child strums their first homemade instrument and realizes they’ve created music. Building a rubber-band guitar is more than just a craft activity—it’s a gateway to understanding fundamental physics concepts, developing fine motor skills, and nurturing musical intelligence in ways that align perfectly with early childhood development.
At The Music Scientist, we believe that hands-on exploration creates the most powerful learning experiences. When children construct their own instruments and experiment with sound, they’re not just playing—they’re conducting real scientific investigations into how music works. This simple activity introduces concepts like pitch, vibration, and frequency in ways that young minds can grasp through direct experience and sensory engagement.
Whether you’re a parent looking for engaging STEM activities at home or an educator seeking developmentally-appropriate music science experiences, this guide will walk you through creating a rubber-band guitar while maximizing the learning potential for children from toddlers to early primary years. You’ll discover how this activity connects to multiple intelligences, supports cognitive development, and can be adapted for various age groups and skill levels.
Build a Rubber-Band Guitar
A Fun Music Science Activity for Young Learners
🎸 What You’ll Need
CONTAINER
Empty tissue box or shoebox
RUBBER BANDS
4-6 bands (various thicknesses)
OPTIONAL
Cardboard tube, tape, decorations
🔬 The Science Behind Sound
⚡
Vibration
Sound is created when objects move back and forth rapidly
📊
Frequency
How fast vibrations happen determines pitch (high or low)
🎵
Pitch
Tight/thin bands = high pitch, loose/thick bands = low pitch
📝 Quick Build Steps
1
Prepare Your Sound Box
Use a tissue box or cut a 3-4 inch hole in a shoebox lid
2
Add the Neck (Optional)
Tape a cardboard tube to one end for authentic guitar feel
3
String Your Guitar
Stretch 4-6 rubber bands of different thicknesses over the sound hole
4
Experiment & Play
Pluck different bands, adjust tension, and explore sounds!
🌟 Developmental Benefits
🧠
Cognitive Skills
Cause-effect learning
✋
Fine Motor
Hand strength
💬
Language
Rich vocabulary
🎼
Musical
Pitch recognition
🔍 Exploration Questions
Compare: What happens when you pluck the thick rubber band versus the thin one?
Experiment: Can you make the sound higher? How about lower?
Create: Can you play a pattern like: high, low, high, low?
⏱️ Quick Activity Summary
15-20
Minutes to Build
18mo+
Age Range
$0
Cost (use home items)
Why Rubber-Band Guitars Make Perfect Learning Tools
The humble rubber-band guitar represents one of the most accessible entry points into understanding both music and physics. Unlike complex instruments that require years of practice, a homemade rubber-band guitar allows children to immediately experience cause and effect—pluck a band, hear a sound. This instant feedback loop is crucial for early learners who are building connections between actions and outcomes.
From a developmental perspective, this activity engages multiple learning modalities simultaneously. Children use kinesthetic intelligence as they manipulate materials and construct their instrument. They activate musical intelligence through listening and comparing different sounds. Logical-mathematical intelligence comes into play as they observe patterns in how different rubber bands produce different pitches. This multi-sensory approach mirrors the philosophy behind programs like Scouts: Fostering A Love for Science through Catchy Melodies, where scientific concepts become memorable through hands-on musical exploration.
Beyond the immediate educational benefits, building instruments fosters creativity and confidence. When children create something functional with their own hands, they develop a sense of agency and accomplishment that extends far beyond the activity itself. They begin to see themselves as makers, scientists, and musicians—identities that can shape their approach to learning throughout their lives.
The Science Behind Sound Frequencies
Before diving into construction, understanding the basic science enriches the learning experience for both adults and children. Sound is created by vibrations—when an object moves back and forth rapidly, it pushes air molecules, creating waves that travel to our ears. The rubber-band guitar makes these vibrations visible and tangible, allowing children to see the band moving as they hear the sound it produces.
Frequency refers to how fast something vibrates, measured in hertz (Hz). When a rubber band vibrates quickly, it creates a high-pitched sound with a high frequency. When it vibrates slowly, the pitch is lower with a lower frequency. This relationship between vibration speed and pitch is fundamental to all musical instruments, from pianos to violins to the human voice itself.
Several factors affect the frequency of a vibrating rubber band. Tension plays a crucial role—stretching a rubber band tighter makes it vibrate faster, producing a higher pitch. The thickness of the band also matters; thicker bands vibrate more slowly than thin ones, creating deeper sounds. Finally, the length of the vibrating section influences pitch—shorter lengths produce higher notes. Children can experiment with all three variables using their homemade guitar, conducting their own scientific investigations into sound.
Making Abstract Concepts Concrete
For young children, abstract concepts like “frequency” and “hertz” may be difficult to grasp verbally, but they can understand them experientially. When a toddler plucks a tight rubber band and hears a high sound, then plucks a loose one and hears a low sound, they’re learning about frequency without needing technical vocabulary. This experiential foundation, similar to the sensory-based approach in Tenderfeet: Infant Care Classes and Sensory Development, creates neural pathways that will support more complex learning later.
What You’ll Need to Build Your Guitar
One of the beauties of this activity is its simplicity—you likely have most materials at home already. Gathering supplies can be part of the learning process, as children help identify and collect what they need.
Essential Materials:
- Container for the body: An empty tissue box, shoebox, or small cardboard box with an opening works perfectly
- Rubber bands: 4-6 rubber bands of different thicknesses and sizes (variety is key for exploring different pitches)
- Cardboard tube: A paper towel or toilet paper tube to serve as the guitar neck (optional but adds authenticity)
- Tape: Masking tape or duct tape for securing components
Optional Enhancement Materials:
- Decorative materials (markers, stickers, paint, construction paper) for personalization
- Pencils or craft sticks to place under rubber bands for added tension variation
- Aluminum foil or bubble wrap for exploring how different materials affect sound resonance
- A tuner app on your phone to measure actual frequencies (for older children)
Safety is paramount when working with young children. Ensure rubber bands are in good condition without cracks (which could cause them to snap), and supervise closely if using scissors or other sharp tools for decoration. For toddlers and younger preschoolers, pre-cutting and preparing some materials can keep the activity safe and focused on the learning objectives.
Step-by-Step: Building Your Rubber-Band Guitar
This construction process can be completed in 15-20 minutes, making it perfect for attention spans of young learners. The steps are intentionally simple, allowing children to be active participants rather than passive observers.
1. Prepare Your Sound Box – Start with your container, which will serve as the resonating chamber. If using a tissue box, the existing opening is perfect. For shoeboxes, you may need to cut a circular or oval hole (approximately 3-4 inches in diameter) in the lid. Explain to your child that this opening is like the sound hole in a real guitar—it allows the sound to come out louder and clearer. Let them feel the difference by speaking into the box with and without a hand covering the opening.
2. Add the Neck (Optional) – If using a cardboard tube as the guitar neck, attach it to one end of the box using tape. This isn’t structurally necessary but makes the instrument more guitar-like and gives children something to hold. Position it on the shorter end of a shoebox or on one side of a tissue box. Secure it firmly with several pieces of tape, and let your child help with the taping—a great fine motor exercise.
3. String Your Guitar – Stretch rubber bands lengthwise around the box, going over the sound hole. Use 4-6 bands of varying thicknesses. Space them evenly so each can be plucked individually. As you add each band, let your child pluck it and describe the sound. Ask questions like, “Does this sound high or low?” This step naturally introduces comparative language and auditory discrimination skills that support early literacy development.
4. Create String Tension Variations – To explore how tension affects pitch, you can place small pencils or craft sticks under the rubber bands near each end of the box, creating a bridge like on real stringed instruments. This elevates the bands and allows you to experiment with pressing down on them to change the pitch—introducing children to how guitarists and violinists create different notes.
5. Personalize and Decorate – Once the functional elements are complete, let creativity flourish. Children can decorate their guitars with markers, stickers, paint, or collage materials. This ownership of their instrument increases engagement and makes the subsequent exploration more meaningful. Some children may want to name their guitar or create a story about it, integrating verbal-linguistic intelligence into the activity.
6. Test and Adjust – Before the formal exploration begins, spend time just playing with the instrument. Pluck different strings, listen to the sounds, and make adjustments. If bands are too loose and produce little sound, replace them with tighter ones. If the sound is muffled, check that the bands are positioned well over the opening. This troubleshooting process teaches problem-solving skills and resilience when things don’t work perfectly the first time.
Exploring Frequencies Through Play
With the guitar complete, the real learning begins through guided exploration and free play. The key is balancing structured investigations with open-ended experimentation, allowing children to discover patterns while following their natural curiosity.
Guided Discovery Questions
Use open-ended questions to prompt scientific thinking without directing every observation. Try questions like: “What happens when you pluck the thick rubber band versus the thin one?” or “Can you make the sound higher? How?” These questions encourage children to form hypotheses and test them—the foundation of scientific inquiry. Similar questioning techniques are used in programs like Groovers: Music and Dance Classes for Toddlers, where exploration is guided but child-directed.
Comparative Listening Activities
Help children develop auditory discrimination skills by comparing sounds systematically. Pluck the thinnest rubber band, then the thickest, and ask them to describe the difference. Introduce simple vocabulary: high/low, fast/slow (for vibrations), loud/quiet. For older preschoolers, you might introduce terms like “pitch” and “vibration.” Create a simple chart where children can draw or place stickers to represent high sounds versus low sounds, integrating early mathematical thinking through classification.
Pattern and Sequence Creation
Once children are comfortable with their instrument, encourage them to create simple musical patterns. “Can you play: high, low, high, low?” or “Can you play the strings from lowest to highest?” Pattern recognition is fundamental to both mathematical thinking and musical development. Children can also create their own patterns and challenge family members to repeat them, building memory skills and sequential thinking.
Vibration Visualization
To make the connection between vibration and sound more concrete, try these visualization techniques. Place small pieces of paper on the box near the rubber bands, then pluck the strings and watch the paper jump. Or, have children gently touch the rubber bands as they vibrate (being careful not to stop the vibration). They can even place their hand on the box to feel the vibrations traveling through the material. These multi-sensory experiences reinforce the concept that sound is physical movement, not magic.
Developmental Benefits for Young Learners
While the rubber-band guitar activity appears simple on the surface, it delivers rich developmental benefits across multiple domains. Understanding these benefits helps parents and educators maximize the learning potential and recognize the value beyond entertainment.
Cognitive Development: This activity builds cause-and-effect understanding, a crucial cognitive milestone. Children learn that their actions (plucking, stretching, adjusting) directly cause observable results (different sounds). They also develop classification skills as they group sounds by characteristics like high/low or loud/quiet. The experimentation process introduces basic scientific method concepts—observing, predicting, testing, and drawing conclusions.
Fine Motor Skills: Stretching rubber bands, plucking individual strings, and decorating the instrument all require precise finger movements that strengthen the small muscles in hands and fingers. These same muscles are essential for writing, buttoning clothes, and other self-care tasks. The activity provides purposeful, engaging fine motor practice that doesn’t feel like “work” to children.
Language Development: Rich vocabulary naturally emerges from this activity—words like vibration, frequency, pitch, tension, pluck, strum, high, low, fast, and slow. When adults use these terms in context while children can see and hear what they mean, vocabulary acquisition is dramatically more effective than rote memorization. Describing sounds and explaining observations also builds expressive language skills.
Musical Intelligence: Even this simple instrument introduces fundamental musical concepts. Children learn about pitch discrimination (recognizing when sounds are different), tone quality (how different materials and tensions create different sound characteristics), and rhythm (when creating patterns). These early musical experiences create neural pathways that support more advanced musical learning later, as emphasized in programs like Happyfeet: Enrichment Classes for 18-Month-Olds & Toddlers.
Focus and Attention: Listening carefully to subtle differences in sound requires sustained attention and concentration. As children work to create specific sounds or patterns, they practice maintaining focus on a goal—an executive function skill that supports all academic learning. The engaging, hands-on nature of the activity makes this practice feel effortless rather than forced.
Adapting the Activity for Different Ages
One of the strengths of the rubber-band guitar activity is its flexibility across age ranges. With thoughtful adaptations, it can be developmentally appropriate for toddlers through early primary years, making it perfect for families with multiple children or mixed-age classroom settings.
For Toddlers (18-36 months)
At this age, the focus should be on sensory exploration and basic cause-and-effect. Pre-assemble the guitar with only 3-4 very different rubber bands (one very thick, one very thin, etc.) so the pitch differences are obvious. Use simple language: “Listen! High sound!” or “That one sounds low.” Let toddlers freely explore plucking and strumming without pressure to create specific patterns. The goal is joy in creating sound and beginning to notice that different strings make different sounds. This sensory-focused approach aligns with the developmental stage addressed in toddler programs at The Music Scientist.
For Preschoolers (3-5 years)
Preschoolers can be more involved in the construction process, helping stretch rubber bands and make decisions about placement. Introduce comparative language more formally: “Which rubber band makes the highest sound? Can you find the lowest?” Create simple challenges like “Can you play just the high sounds?” or “Can you make a pattern: high, low, high, low?” This age group can also begin understanding simple explanations about vibration—”The rubber band is moving really fast, and that fast movement makes the high sound.” They can handle more complex decoration and may want to create elaborate backstories for their instruments.
For Early Primary Children (5-7 years)
Older children can explore the science more deeply. Introduce vocabulary like frequency, vibration, and pitch formally. They can measure and record data—”Which rubber band is thickest? Which makes the lowest sound?”—creating simple charts or graphs. Experiments can become more systematic: “What happens if we make the rubber band tighter? Let’s predict first, then test.” These children can also explore musical concepts like creating simple melodies, playing along with songs, or even creating their own musical notation system. For children at this level, the activity can connect to broader STEM learning goals similar to those in SMART-START English programs that prepare children for formal academic settings.
Extension Activities to Deepen Learning
Once children have mastered the basic rubber-band guitar, numerous extension activities can deepen understanding and maintain engagement over time. These extensions allow you to revisit the instrument across multiple sessions, each time adding new dimensions to the learning.
Build a Family Band: Have each family member create their own rubber-band guitar with different characteristics—one with all thin bands, one with all thick bands, one with long bands, one with short bands. Then explore how they sound different and try to play simple songs together. This collaborative experience builds social skills and introduces the concept of musical ensembles.
Explore Other Homemade Instruments: Expand into percussion with rice shakers, water xylophones with glasses filled to different levels, or drum sets from pots and pans. Compare how different types of instruments create sound—some through vibrating strings, some through vibrating air columns, some through vibrating surfaces. This broadens understanding of sound physics while building a diverse instrumental repertoire.
Recording and Playback: Use a smartphone or tablet to record children playing their guitars, then play the recordings back. Many children are fascinated by hearing themselves and will listen with intense focus, developing auditory processing skills. You can also record the same string multiple times to demonstrate that it produces consistent pitches, introducing the concept of reliability in scientific observations.
Sound Wave Visualization: For older children interested in the technology side, use free apps that visualize sound waves. Pluck different rubber bands and watch how the wave patterns differ—high frequencies create waves that are close together, low frequencies create waves that are spaced farther apart. This visualization bridges the physical vibration they can see with the abstract concept of frequency.
Creative Storytelling: Integrate the guitar into imaginative play by creating stories where the instrument plays a role—perhaps it’s a magical guitar that can communicate with animals, or a scientific tool that helps characters solve problems. Use the guitar to create sound effects for the story. This integration of music, science, and narrative thinking supports creative development and helps children see connections across different learning domains.
Comparative Materials Exploration: After mastering the rubber-band guitar, experiment with other materials. What happens if you stretch string across the box instead? What about plastic wrap stretched tight like a drum? How do metal springs sound compared to rubber? These variations help children understand that the principles they’ve learned (tension, thickness, length affecting pitch) apply across different materials, promoting transfer of knowledge.
Building a rubber-band guitar transforms everyday materials into powerful learning tools, creating moments of discovery that resonate far beyond the activity itself. When children experiment with tension, thickness, and length to create different sounds, they’re not just playing—they’re conducting genuine scientific investigations that build foundational understanding of physics, music, and mathematics.
The beauty of this activity lies in its accessibility and adaptability. Whether your child is a toddler experiencing cause-and-effect for the first time or a preschooler ready to explore frequency and pitch more formally, the rubber-band guitar meets them at their developmental level while gently stretching their capabilities. The hands-on, multi-sensory nature of the experience ensures that learning happens naturally through exploration rather than instruction, creating the kind of deep understanding that comes from personal discovery.
At The Music Scientist, we’ve seen how activities that combine music, movement, and scientific thinking create powerful pathways for cognitive development. The rubber-band guitar exemplifies this approach—it’s simultaneously a musical instrument, a scientific tool, and a creative project. Most importantly, it’s an invitation for children to see themselves as makers, musicians, and scientists capable of understanding and shaping the world around them.
As you embark on this musical science adventure with your child, remember that the process is more valuable than the product. Celebrate the questions, embrace the experimentation, and enjoy the unique sounds of your homemade creation. These moments of shared discovery become the foundation for a lifelong love of learning, music, and scientific inquiry.
Nurture Your Child’s Love for Music and Learning
At The Music Scientist, we create engaging, developmentally-focused programs that combine music, movement, and hands-on exploration to promote cognitive development in children aged 4 to 47 months. From sensory-rich infant classes to preschool readiness programs, we use music as a powerful medium to nurture young minds and build confidence.
Discover how our holistic approach can support your child’s development across multiple intelligences—musical, kinesthetic, logical, and verbal. Whether you’re interested in our in-house enrichment classes or our collaboration programs with preschools, we’re here to help your child thrive.
Table Of Contents
- The Natural Connection Between Music and Mathematical Thinking
- Understanding Beat Subdivision for Young Learners
- How Music Makes Fractions Tangible
- Beat Subdivision Games by Age Group
- Implementing Beat Subdivision Activities at Home
- Cognitive Benefits Beyond Music and Math
- Integrating Beat Subdivision into Daily Routines
When your toddler claps along to their favorite song or stomps their feet to a steady rhythm, they’re doing far more than simply enjoying music—they’re building foundational mathematical concepts that will serve them throughout their educational journey. The intricate relationship between music and fractions represents one of the most elegant intersections of arts and mathematics, and it’s surprisingly accessible even to our youngest learners.
Beat subdivision, the process of dividing musical beats into smaller rhythmic units, provides a sensory-rich, kinesthetic pathway to understanding fractions. When a child experiences how one whole beat can be divided into two eighth notes or four sixteenth notes, they’re grasping the same conceptual framework that underlies ½, ¼, and other fractional relationships. Unlike abstract numerical representations that may feel disconnected from a young child’s experience, musical beat subdivision is something they can hear, feel, move to, and internalize through their entire body.
This article explores how music educators and parents can harness the power of beat subdivision games to nurture both musical aptitude and mathematical thinking in children from infancy through the preschool years. Drawing on developmental principles and multi-sensory learning approaches, we’ll provide practical activities tailored to different age groups, ensuring that even the youngest children can begin building these essential cognitive connections through playful, engaging musical experiences.
Music & Fractions: The Perfect Harmony
How Beat Subdivision Games Build Mathematical Thinking
🎵 Why Music + Math Work Together
When children experience how one beat divides into two eighth notes or four sixteenth notes, they’re grasping the same framework that underlies ½, ¼, and other fractions—but through sound, movement, and their entire body instead of abstract symbols.
👶
4-18 Months
Steady Beat Focus
Bounce & pat activities, sensory contrasts
🚶
18-30 Months
Active Participation
Walk & run games, instrument swaps
🎓
30+ Months
Complex Patterns
Rhythm layering, pizza fractions
🎯 Key Beat Subdivision Activities
Walk & Run
Feel 2:1 ratio through whole-body movement
Pizza Rhythm
Visualize fractions with circular divisions
Fruit Salad
Assign note values to different fruits
Freeze Dance
Switch between beat & subdivision on cue
💡 Quick Implementation Tips
1
Start with steady beat: Master pulse before introducing subdivisions
2
Use household items: Pots, spoons, and containers work perfectly
3
Integrate into routines: Turn cleanup, meals & transitions into rhythm games
4
Keep it playful: Joy and exploration matter more than perfection
🎼 The Bottom Line
Beat subdivision games transform abstract fractions into tangible, joyful experiences. Through music, movement, and play, young learners build mathematical foundations that will support them throughout their educational journey—all while having fun!
The Natural Connection Between Music and Mathematical Thinking
Music and mathematics share a deep structural relationship that neuroscientists have documented extensively. Both disciplines require pattern recognition, proportional reasoning, and the ability to understand how parts relate to wholes. When children engage with rhythm and beat, they activate the same neural pathways involved in numerical processing and spatial reasoning, creating a powerful foundation for mathematical thinking that feels entirely natural and joyful.
Research in early childhood development reveals that musical experiences during the first four years of life significantly enhance cognitive flexibility and abstract thinking. The temporal nature of music—how sounds unfold across time in organized patterns—provides children with their earliest experiences of sequence, duration, and proportional relationships. These are the building blocks of mathematical understanding, presented in a format that appeals directly to young children’s love of sound, movement, and repetition.
For infants and toddlers, the body serves as the primary instrument for learning. Kinesthetic learning—understanding through physical movement—allows children to embody rhythmic concepts before they can articulate them verbally or represent them symbolically. When a child bounces on steady quarter notes and then switches to faster eighth-note movements, they’re experiencing firsthand how rhythm can be divided and multiplied, laying groundwork for fractional thinking that will emerge more formally in later years.
At The Music Scientist, we’ve observed how children who regularly engage with rhythmic subdivision activities demonstrate enhanced focus, improved pattern recognition, and greater ease with mathematical concepts when they enter formal schooling. The key lies in presenting these concepts through developmentally appropriate, play-based experiences that prioritize joy and exploration over rote instruction.
Understanding Beat Subdivision for Young Learners
Beat subdivision refers to dividing a steady pulse into smaller, equally-spaced rhythmic units. Imagine a clock ticking steadily—that’s your basic beat. Now imagine hearing two ticks for every one original tick, then four, then eight. Each level of subdivision creates a new rhythmic layer that maintains a precise mathematical relationship to the original pulse.
For young children, we begin with the most fundamental subdivision: dividing one beat into two equal parts. This creates what musicians call eighth notes—two sounds that together equal one quarter note beat. This 2:1 ratio is the most accessible fraction for young minds because it mirrors experiences they encounter daily: one apple cut into two halves, one cookie shared between two friends, or one bedtime story with two characters.
As children develop greater rhythmic coordination and cognitive sophistication, they can explore more complex subdivisions. Dividing one beat into four equal parts (sixteenth notes) introduces the concept of quarters, while grouping beats into sets of three introduces triplet subdivisions. Each new level of subdivision expands a child’s understanding of how wholes can be divided into equal parts and how those parts can be recombined—the essence of fractional thinking.
Developmental Readiness for Rhythmic Concepts
Not all subdivisions are appropriate for all ages, and respecting developmental milestones ensures children experience success rather than frustration. Infants in our Tenderfeet program begin by simply experiencing steady beat through bouncing, rocking, and patting activities. This foundational pulse awareness must be firmly established before subdivision can be meaningfully introduced.
Toddlers around 18-24 months, like those in our Happyfeet classes, typically develop the motor coordination to alternate between steady beat movements and simple subdivisions. They might stomp on the beat and then switch to faster tapping, experiencing the contrast between whole beats and divided beats without needing to understand the mathematical terminology.
By the time children reach 30 months and beyond—the age range for our Groovers program—many can maintain independent subdivisions, perform layered rhythms (one hand on the beat, one on the subdivision), and begin to verbally acknowledge the relationships between different rhythmic levels. This is when beat subdivision games can become more sophisticated and explicitly connected to pre-mathematical concepts.
How Music Makes Fractions Tangible
The abstract nature of fractions makes them notoriously challenging for children when introduced purely through visual symbols or verbal explanations. How can a four-year-old truly understand that ¼ is smaller than ½ when both involve the number four? Music bypasses this confusion by making fractional relationships audible, visible through movement, and experientially obvious.
When children hear a rhythm pattern where four quick sounds fit into the same time span as one longer sound, they’re experiencing the fraction ¼ in action. They can clap it, dance it, sing it, and play it on instruments. The temporal nature of music means that these relationships unfold in real-time, providing immediate sensory feedback that confirms or corrects their understanding. If the four quick claps don’t fit evenly into the beat, children hear the mismatch immediately and can adjust.
This multisensory approach aligns perfectly with how young children naturally learn. Rather than memorizing that four quarters equal one whole, they experience the relationship through coordinated movement, auditory patterns, and social interaction. The learning becomes embedded in muscle memory and auditory processing, creating robust neural connections that support later symbolic understanding.
Visual and Kinesthetic Representations
Effective beat subdivision activities combine auditory experiences with visual and kinesthetic elements. Large floor drums divided into colored sections can represent different note values—one color for whole beats, another for subdivisions. Movement scarves of different lengths can show how longer movements represent longer note values while shorter, quicker movements represent subdivisions.
Body percussion provides another powerful tool for making subdivisions tangible. Stomping might represent the steady beat while clapping represents eighth-note subdivisions, allowing children to literally embody the mathematical relationship. When the whole class stomps together on beat one while half the class claps the subdivisions, children hear and see the fraction in action through their community’s collective rhythm.
Beat Subdivision Games by Age Group
The following activities are designed to introduce beat subdivision concepts in developmentally appropriate, engaging ways. Each game prioritizes playfulness and sensory exploration while building the cognitive foundations for both musical and mathematical understanding.
For Infants and Young Toddlers (4-18 Months)
At this stage, the focus is on establishing steady beat awareness rather than explicit subdivision. However, even young infants can experience the sensory contrast between steady pulses and faster subdivisions, planting early seeds for later fractional understanding.
Bounce and Pat: Hold your infant securely and bounce gently on a steady beat while singing a simple song. Then transition to faster, lighter pats on their legs or back that subdivide the beat. The contrast between the deeper, slower bounce and the quicker, lighter pats provides sensory experience of rhythmic division. Return to the steady bounce, creating a predictable pattern that infants can anticipate.
Drum Echo Exploration: Using a hand drum or even an overturned pot, play a steady beat pattern and then a faster subdivided pattern. Even pre-verbal infants will turn toward the sound changes, tracking the rhythmic variation. As they grow into toddlers, they’ll begin reaching for the drum to create their own patterns, naturally exploring different speeds of striking.
Scarf Dancing: Large, lightweight scarves provide visual representation of beat and subdivision. Swing the scarf slowly in large arcs on the steady beat, then switch to faster, smaller movements on subdivisions. The visual contrast reinforces the auditory experience, engaging multiple learning pathways simultaneously.
For Active Toddlers (18-30 Months)
Toddlers in this age range are developing greater motor control and can begin to actively participate in creating both steady beats and simple subdivisions. Their growing language skills also allow for simple verbal cues and song lyrics that reinforce rhythmic concepts.
Walk and Run Game: This classic Dalcroze eurhythmics activity makes beat subdivision kinesthetically obvious. Play music with a clear steady beat and have toddlers walk in time with the pulse. When you change to faster music (or simply say “Run!”), children move with quicker steps that naturally subdivide the beat. Alternate between walking and running, helping children feel the 2:1 relationship in their whole bodies. This activity can be enhanced with visual cues like large footprint cutouts spaced for walking versus smaller footprints clustered for running.
Big Steps, Little Steps: Similar to the walk-run game but with more control, children take giant steps on the beat and tiny steps on subdivisions. Adding verbal chanting (“BIG, little-little, BIG, little-little”) reinforces the pattern through the linguistic rhythm as well. This can be performed to recorded music or simply to a drum beat you provide.
Instrument Swap: Provide two contrasting instruments—perhaps a large floor drum and a small shaker. Children play the big drum on steady beats and shake the shaker on faster subdivisions. The timbral difference between instruments helps distinguish the two rhythmic levels while the physical act of switching instruments adds a motor planning element that enhances cognitive engagement.
For Preschoolers (30+ Months)
Preschool-aged children can handle more complex rhythmic challenges and can begin to understand verbal explanations of the relationships between beats and subdivisions. This is when the connection to pre-mathematical fractional concepts can become more explicit.
Pizza Rhythm Game: Create a large circle (the “pizza”) using floor tape or a hula hoop. When you play one steady beat, the pizza stays whole. When you play two sounds per beat, show the pizza cut in half. Four sounds per beat? Cut it into quarters. Children can physically walk around each pizza slice, seeing and experiencing how the same-sized circle contains different numbers of equal parts depending on the subdivision. This concrete representation bridges musical rhythm and fractional concepts beautifully.
Rhythm Layering Challenge: Divide children into two groups. One group maintains steady quarter-note claps while the other claps eighth-note subdivisions. Then switch roles. This requires children to maintain their rhythmic independence while hearing a contrasting pattern, building both musical skills and executive function. As children succeed, you can add a third layer (such as a teacher or parent playing half notes on a drum) to demonstrate longer note values as well.
Freeze Dance Fractions: Play music with a clear beat and have children dance using large, steady movements on the beat. When you call out “Subdivide!” they switch to smaller, faster movements that divide the beat. When you call “Freeze!” everyone stops and you discuss what they noticed: “Were your movements bigger or smaller when we subdivided? Faster or slower? Did you take more steps or fewer steps?” This metacognitive discussion helps children articulate their experiential understanding.
Fruit Salad Rhythm: Assign different fruits to different note values: watermelons for whole notes (holding the sound for four beats), apples for quarter notes (one beat each), and grapes for eighth notes (two quick sounds per beat). Show picture cards or real fruit and have children clap/tap/move according to which fruit you display. This combines categorization, symbolic representation, and rhythmic subdivision in a playful, memorable way. Children in our Scouts program particularly enjoy this activity as it combines their growing scientific curiosity with musical learning.
Implementing Beat Subdivision Activities at Home
Parents don’t need formal musical training to introduce beat subdivision concepts at home. The most important elements are a steady sense of pulse, enthusiasm, and willingness to be playful. Many everyday household items can serve as rhythm instruments, and countless children’s songs provide appropriate musical material for subdivision exploration.
Start by establishing your own comfort with maintaining a steady beat. Practice tapping your foot, patting your knees, or clapping in time to familiar songs. Once you feel confident maintaining that pulse, experiment with clapping twice per beat, creating the subdivision. It doesn’t need to be musically perfect—children benefit from the experience of exploring rhythm together, not from flawless execution.
Creating a rhythm-rich environment supports spontaneous musical play. Keep a basket of safe rhythm instruments accessible to your child: wooden spoons for tapping, shakers made from sealed containers with rice or beans, small drums or overturned pots, and bells or jingles. When these items are readily available, children naturally experiment with different speeds and patterns, discovering beat subdivision through self-directed play.
Selecting Appropriate Songs
The best songs for beat subdivision activities have clear, steady beats and moderate tempos. Very fast songs overwhelm young children’s motor systems, while very slow songs make it difficult to maintain the pulse. Aim for songs around 80-120 beats per minute—roughly the pace of a comfortable walking speed.
Traditional children’s songs like “Twinkle, Twinkle Little Star,” “Row, Row, Row Your Boat,” and “The Wheels on the Bus” work beautifully because their strong, predictable beats allow children to successfully clap, tap, or move along. Many of these songs also naturally include both steady beat and subdivision opportunities within their lyrics—the steady “wheels on the bus go round and round” followed by faster “all through the town” creates built-in rhythmic variation.
Originally composed music designed specifically for early childhood development, like those used in our programs, often intentionally incorporates rhythmic variations that highlight beat subdivision. These songs are carefully constructed to guide children’s attention to different rhythmic layers while maintaining engagement through melodic interest and age-appropriate themes.
Cognitive Benefits Beyond Music and Math
While the connection between beat subdivision and fractional understanding is compelling, the benefits of rhythmic activities extend far beyond these two domains. Regular engagement with beat subdivision games nurtures a constellation of cognitive skills that support all areas of learning and development.
Executive function skills—including working memory, inhibitory control, and cognitive flexibility—are all strengthened through rhythmic activities. Maintaining a steady beat while hearing a different subdivision pattern requires children to hold two contrasting ideas in mind simultaneously and resist the pull to switch to the more salient pattern. Transitioning smoothly between beat and subdivision on cue demands cognitive flexibility and motor planning.
These experiences also build auditory processing skills that are foundational for language development and reading readiness. The ability to perceive small differences in timing, to track multiple auditory streams simultaneously, and to anticipate what comes next in a sequential pattern all support phonological awareness—the understanding that words can be broken into smaller sound units. This is why our SMART-START English and SMART-START Chinese programs integrate extensive rhythmic work alongside language development activities.
Social-emotional development benefits as well. Group rhythm activities require children to coordinate with others, take turns, listen attentively, and share musical space. The success children experience when they successfully subdivide a beat or maintain an independent rhythm builds confidence and self-efficacy. The joyful, playful nature of musical games reduces stress and creates positive associations with learning challenges.
Supporting Attention and Focus
In an age of constant digital stimulation, helping children develop sustained attention is increasingly important. Beat subdivision activities offer a compelling form of focused engagement because they’re dynamic, participatory, and immediately rewarding. Unlike passive screen time, rhythmic games require active participation—children must listen, process, plan motor responses, and execute movements in real-time.
The repetitive nature of rhythm work, rather than being monotonous, actually supports attention development. Children can predict what comes next, experience success, and build the neural pathways associated with sustained focus. As they master simpler subdivisions, the challenge can be gradually increased, maintaining engagement in what developmental psychologists call the “zone of proximal development”—that sweet spot where tasks are challenging enough to require focus but not so difficult as to cause frustration.
Integrating Beat Subdivision into Daily Routines
The most effective learning happens through frequent, brief interactions rather than occasional extended lessons. Beat subdivision concepts can be woven seamlessly into daily routines, making musical and mathematical learning a natural part of your child’s day rather than an isolated activity.
During transition times, use rhythmic chants to move from one activity to another. “Big steps, little steps, walking to the door” provides both the verbal cue and the rhythmic framework for transitioning while practicing beat subdivision. Cleanup time becomes more engaging when toys are picked up on the beat or on subdivisions, with you drumming on a surface to provide the pulse.
Meal preparation offers natural opportunities for rhythm exploration. Stirring in large, slow circles on the beat and then smaller, faster circles on subdivisions makes cooking collaborative and educational. Setting the table to a steady beat or folding napkins with “big fold, little fold, little fold” patterns integrates rhythm into daily tasks.
Even bedtime routines can incorporate gentle rhythmic elements. Rocking to a steady beat while singing a lullaby, then transitioning to gentle pats that subdivide the beat as your child settles, provides calming rhythmic structure that supports the transition to sleep. The predictability of the rhythmic pattern is inherently soothing while still providing sensory input that reinforces beat subdivision awareness.
Car rides, waiting rooms, and other potentially challenging moments become opportunities for musical play when you have a repertoire of rhythm games. Clapping games, rhythm echoes, and subdivision challenges require no materials and can be adapted to any setting, turning potentially frustrating wait times into valuable learning moments.
By approaching beat subdivision as a playful, integrated part of daily life rather than a formal lesson, you create hundreds of micro-learning moments that cumulatively build robust musical and mathematical understanding. Children absorb these concepts naturally, without the pressure of performance or the anxiety sometimes associated with mathematics instruction, setting them up for confident engagement with both music and math throughout their educational journey.
The beautiful intersection of music and mathematics offers parents and educators a powerful tool for nurturing young minds. Beat subdivision games provide developmentally appropriate, joyful pathways to understanding fractional relationships, temporal sequencing, and proportional reasoning—all while building musical skills, executive function, and social-emotional confidence.
From the earliest bounce games with infants to sophisticated rhythmic layering with preschoolers, these activities respect children’s developmental readiness while challenging them to grow. The multisensory nature of rhythmic learning—engaging auditory, kinesthetic, visual, and social learning channels simultaneously—creates robust neural connections that support learning across all domains.
Most importantly, beat subdivision games are inherently enjoyable. When learning feels like play, when mathematical concepts are discovered through movement and music rather than worksheets and memorization, children develop positive associations with both disciplines. They come to see themselves as capable, musical, mathematical thinkers—an identity that will serve them throughout their educational journey and beyond.
Whether you’re implementing these activities at home, in early childhood classrooms, or through structured music programs, the key is consistency, playfulness, and attention to each child’s developmental readiness. Start simply, celebrate small successes, and trust that through repeated, joyful experiences with rhythm and beat, you’re building foundations that will support a lifetime of musical and mathematical confidence.
Nurture Your Child’s Musical and Mathematical Potential
At The Music Scientist, our developmentally-focused programs integrate beat subdivision, rhythm exploration, and musical play to build cognitive foundations that support lifelong learning. From infant sensory classes to preschool readiness programs, we combine originally composed music with research-backed pedagogical approaches to nurture confident, curious, capable learners.
Ready to explore how music can transform your child’s learning journey?Contact us today to learn more about our programs and find the perfect fit for your child’s developmental stage.
Table Of Contents
- What is Makey Makey and How Does It Work?
- Why Turn Fruit into Piano Keys? The Educational Benefits
- What You’ll Need for Your Fruit Piano
- Step-by-Step Guide to Creating Your Fruit Piano
- Troubleshooting Common Issues
- Extending the Learning Experience
- Age-Appropriate Adaptations for Different Developmental Stages
- Connecting Technology to Traditional Music Learning
Imagine your child’s delight when they press a banana and hear a piano note ring out, or tap a strawberry to create a melody. This isn’t magic—it’s the wonderful intersection of music, technology, and hands-on discovery that happens when you use Makey Makey to turn ordinary fruit into extraordinary musical instruments.
For parents and educators seeking innovative ways to engage young learners, the fruit piano project offers something truly special: a multisensory experience that simultaneously develops musical awareness, scientific thinking, and fine motor skills. Children as young as three can participate in simplified versions, while older preschoolers can grasp the fascinating science behind how their fruit keyboard actually works.
This comprehensive guide will walk you through everything you need to know to create your own fruit piano at home or in the classroom. We’ll explore the developmental benefits, provide clear setup instructions, and share creative extensions that transform a simple tech experiment into a rich learning journey that complements structured music programs.
Turn Fruit into Piano Keys! 🍌🎹
A Musical STEM Adventure with Makey Makey
🛠️ What You’ll Need
Essential Tech
• Makey Makey kit
• Computer/tablet
• USB cable
• Computer/tablet
• USB cable
Fresh Produce
• 5-8 fruits (bananas, oranges, strawberries)
• Water-rich works best!
• Water-rich works best!
Setup Materials
• Aluminum foil
• Alligator clips
• Flat surface
• Alligator clips
• Flat surface
🎵 5 Simple Steps to Musical Magic
1
Open Online Piano
Launch a virtual piano app in your browser
2
Connect Makey Makey
Plug USB into computer—it works instantly!
3
Set Up Ground Wire
Attach alligator clip to “EARTH” and aluminum foil
4
Connect Your Fruits
Clip fruits to board connections—arrange like piano keys
5
Play and Create!
Touch foil with one hand, tap fruits to make music
🧠 Developmental Superpowers Unlocked
🎼
Musical Intelligence
Pitch & rhythm recognition
🔬
STEM Thinking
Circuits & conductivity
✋
Motor Skills
Hand-eye coordination
💬
Language Skills
Rich vocabulary building
👶 Perfect for Every Stage
Toddlers (18-24 months)
2-3 large fruits • Sensory focus • Adult support
Preschoolers (3-4 years)
5-6 fruits • Color coding • Simple melodies
Pre-K/Kinder (5-6 years)
Full octave • Note names • Original composition
💡 Quick Troubleshooting Tips
✓
No sound? Check ground connection & ensure clips are firmly attached
✓
Weak signal? Try juicier fruits like oranges or berries
✓
Multiple notes? Space fruits further apart to prevent touching
Transform Play into Learning!
Discover how structured music programs can complement hands-on STEM adventures and support your child’s complete development.
What is Makey Makey and How Does It Work?
Makey Makey is an innovative invention kit that transforms everyday objects into touchpads that can control your computer. Think of it as a playful circuit board that connects the physical world to the digital realm. The device works by completing electrical circuits—when you touch a conductive object (like fruit) that’s connected to the Makey Makey board, you complete the circuit and send a signal to your computer, just like pressing a keyboard key.
The science behind it is beautifully simple: conductivity. Our bodies conduct electricity, and so do many common materials including fruits and vegetables (thanks to their water content). When you hold the ground wire and touch a banana connected to the Makey Makey, electricity flows through the banana, through your body, and back to the board—triggering whatever computer function you’ve programmed.
What makes Makey Makey particularly valuable for early childhood learning is that children don’t need to understand complex coding or circuitry to experience success. They can see immediate cause-and-effect relationships: I touch this orange, I hear that sound. This concrete, tangible interaction forms the foundation for more abstract scientific thinking as children develop.
Why Turn Fruit into Piano Keys? The Educational Benefits
Creating a fruit piano isn’t just a novelty—it’s a powerful learning tool that engages multiple developmental areas simultaneously. This activity exemplifies the kind of integrated learning approach that research shows is most effective for young children, combining domains that are often taught separately.
Musical Intelligence Development
When children create and play a fruit piano, they’re developing pitch recognition, rhythm awareness, and melodic memory. Unlike passive music listening, this hands-on approach requires active engagement—children must coordinate their movements to create intentional sounds, building the neural pathways that support musical learning. The visual component (seeing which fruit they’re touching) reinforces auditory learning, creating stronger memory connections.
Logical-Mathematical Thinking
The fruit piano introduces foundational STEM concepts through experiential learning. Children explore conductivity, circuits, cause-and-effect relationships, and basic programming concepts. They begin to understand that technology isn’t magic—it follows logical rules and patterns they can predict and control. This builds computational thinking skills that form the basis for later academic success in mathematics and science.
Kinesthetic Learning Through Movement
Young children are natural kinesthetic learners—they understand the world through physical interaction. The fruit piano transforms abstract musical concepts into tangible experiences. Children develop fine motor control as they precisely touch individual fruits, hand-eye coordination as they match visual targets with movements, and spatial awareness as they navigate their edible keyboard.
Verbal and Social Skills
This activity naturally generates rich vocabulary opportunities. Children learn words like “circuit,” “conductor,” “electricity,” “pitch,” and “melody” in meaningful contexts. When done as a group activity, the fruit piano promotes collaborative play, turn-taking, and creative expression—all critical social-emotional competencies.
What You’ll Need for Your Fruit Piano
Gathering your materials is part of the fun! Involve your child in the preparation process to build anticipation and ownership of the project.
Essential Materials:
- Makey Makey Classic Kit – includes the circuit board, USB cable, and alligator clips
- Computer or tablet – with internet access to use online piano applications
- Assorted fruits – bananas, oranges, strawberries, apples, grapes, or any water-rich fruit (5-8 pieces)
- Grounding material – aluminum foil works perfectly
- Flat surface – table or large tray to arrange your fruit keyboard
Optional Enhancements:
- Colorful plates or bowls to organize fruits visually
- Labels or cards showing note names (C, D, E, F, G, A, B)
- Simple sheet music with color-coded notes
- Additional alligator clips for expanding your piano
- External speakers for amplified sound
When selecting fruits, choose a variety of sizes, colors, and textures. This diversity adds sensory richness to the experience and creates visual interest that helps younger children distinguish between different keys. Firmer fruits like apples and oranges work slightly better than very soft fruits, though all water-containing produce will function as conductors.
Step-by-Step Guide to Creating Your Fruit Piano
Follow these clear instructions to set up your fruit piano. For younger children (ages 3-4), adults should handle the computer setup while children help arrange fruits and test connections. Older preschoolers (ages 5-6) can participate more fully in the connection process with supervision.
1. Set Up Your Online Piano – Before connecting any hardware, open an online virtual piano on your computer. The Makey Makey website offers free, child-friendly piano apps specifically designed for this purpose. Alternatively, simple piano simulators that respond to keyboard presses (using keys like A, S, D, F, G, H, J) work perfectly. Test that the online piano produces sounds when you click keys with your mouse.
2. Connect Makey Makey to Your Computer – Plug the USB cable from your Makey Makey board into your computer’s USB port. No software installation is required—the device works immediately. The computer recognizes Makey Makey as a standard keyboard, which is the clever innovation that makes this technology so accessible.
3. Prepare Your Ground Connection – Create a “ground” by placing aluminum foil on your workspace or using the ground connector that comes with your kit. Attach one end of an alligator clip to the “EARTH” or “GND” connection on the bottom of the Makey Makey board, and clip the other end to your aluminum foil. This ground connection is essential—it completes the circuit through your body when you touch the fruit.
4. Arrange Your Fruit Keyboard – Lay out your fruits in a row from left to right, just like piano keys. This spatial organization helps children understand the musical scale. You might start with five fruits for a simple C-D-E-F-G scale, or use eight fruits for a full octave. Space them so little fingers can easily touch each fruit individually without accidentally triggering neighboring keys.
5. Connect Fruits to Makey Makey – Using alligator clips, connect each fruit to the top connections on your Makey Makey board. The top six connections typically correspond to the keys W, A, S, D, F, and G on a standard keyboard. Clip one end of an alligator clip to the metal connector on the board, and attach the other end directly to your fruit—push the clip gently into the fruit skin for a secure connection. For younger children, you can place the fruit on small plates and clip to the fruit’s surface instead.
6. Test Your Connections – Before the grand performance, test each fruit key. Touch the aluminum foil ground with one hand, then touch each connected fruit with your other hand. You should hear a piano note for each fruit you touch. If a fruit doesn’t produce sound, check that the alligator clip is firmly attached both to the board and to the fruit.
7. Play Your Fruit Piano! – Now comes the magical moment! With one hand on the ground (aluminum foil), use your other hand to tap, press, or touch the fruits to create music. Encourage your child to experiment with different touching techniques—quick taps versus sustained touches, using different fingers, or even trying gentle touches versus firmer presses.
The setup process itself is valuable learning time. Resist the urge to rush through it. Let children observe the connections, ask questions about why we need the ground wire, and predict which fruit will make which sound. This inquiry-based approach develops scientific thinking and encourages natural curiosity.
Troubleshooting Common Issues
Even with careful setup, you might encounter small challenges. These problem-solving moments are actually wonderful learning opportunities that teach persistence and logical thinking.
No sound when touching fruit: First, verify that you’re touching the ground connection with one hand while touching the fruit with the other. The circuit must be complete. Check that alligator clips are firmly attached to both the board and the fruit. Ensure the online piano application is active on your screen (click on it to make sure it’s the selected window).
Intermittent or weak connection: Some fruits work better than others due to varying moisture content. Try inserting the alligator clip slightly deeper into the fruit, or switch to a juicier alternative. Citrus fruits (oranges, lemons) and berries typically provide excellent conductivity.
Multiple notes playing at once: This usually happens when fruits are too close together, or when alligator clips are touching each other. Space fruits further apart and ensure clips aren’t creating unintended connections. Younger children might also be touching multiple fruits simultaneously—guide them to use one finger at a time for clearer notes.
Online piano not responding: Refresh your browser or try a different piano application. Some virtual pianos have specific key mappings that may not match your Makey Makey setup. The official Makey Makey apps are optimized for this purpose and typically work most reliably.
Extending the Learning Experience
Once you’ve mastered the basic fruit piano, countless extensions can deepen learning and maintain engagement over multiple sessions. These variations prevent the activity from becoming a one-time novelty and transform it into a rich, ongoing exploration.
Musical Challenges
Introduce simple songs your child already knows. “Mary Had a Little Lamb,” “Hot Cross Buns,” or “Twinkle, Twinkle Little Star” can all be played on a five-note scale. Create visual song cards using colors or fruit pictures to show which keys to press in sequence. This builds pattern recognition, sequential memory, and early reading skills as children follow left-to-right progression.
For children engaged in structured music programs like Scouts: Fostering A Love for Science through Catchy Melodies, the fruit piano becomes a playful way to practice melodies they’re learning in class, reinforcing musical concepts through multisensory repetition.
Scientific Exploration
Turn your fruit piano into a conductivity laboratory. Challenge children to predict which household items will work as piano keys. Test vegetables (carrots, celery, potatoes), play dough, water, metal objects, and even people! Create a chart documenting predictions and results. This experimental approach develops hypothesis formation and observation skills—fundamental scientific practices.
Discuss why some materials work while others don’t. Introduce vocabulary like “conductor” and “insulator” in age-appropriate ways. You might say, “The electricity likes to travel through the banana because it’s full of water, but it can’t move through the plastic toy.”
Creative Composition
Encourage original music creation. Ask your child to compose a “banana song” or “strawberry symphony.” Record their performances and play them back, building self-awareness and confidence. For children who love performance, organize a family concert where they demonstrate their fruit piano to siblings or grandparents, developing presentation skills and pride in accomplishment.
Cross-Curricular Connections
Integrate other learning areas. Practice counting by numbering the fruits 1-8. Explore colors by organizing fruits in rainbow order. Discuss healthy eating and nutrition—what vitamins do these fruits contain? This holistic approach mirrors the integrated learning philosophy that makes programs like Groovers: Music and Dance Classes for Toddlers so effective in supporting comprehensive development.
Age-Appropriate Adaptations for Different Developmental Stages
The fruit piano project can be successfully adapted for various developmental levels, making it a versatile learning tool that grows with your child.
Toddlers (18-24 Months)
For very young learners similar to those in Happyfeet: Enrichment Classes for 18-Month-Olds & Toddlers, simplify the experience dramatically. Use just 2-3 large fruits with high visual contrast (a banana, an orange, and a strawberry). Focus on the sensory experience and cause-effect relationship rather than musical accuracy. Celebrate every touch and sound. Support their hand as they touch fruits while you maintain the ground connection. The goal at this stage is joyful exploration and building positive associations with music-making and technology.
Preschoolers (3-4 Years)
Three and four-year-olds can manage 5-6 fruits and begin understanding simple melodies. Use color-coding to help them follow song patterns—for example, “Touch red, yellow, yellow, red” to play a simple tune. At this stage, children can help with setup by arranging fruits and testing connections with adult guidance. Incorporate movement by having them dance between piano playing, combining the kinesthetic approach found in Groovers classes with technology exploration.
Pre-K and Kindergarten (5-6 Years)
Older preschoolers can handle the full complexity of the fruit piano. They can help with most of the setup process, understand the science behind conductivity at a basic level, and follow more complex musical patterns. Introduce letter names for notes and simple musical notation. Children at this developmental stage, particularly those in preschool readiness programs like SMART-START English, can connect this hands-on project to broader learning themes and articulate what they’re discovering.
Connecting Technology to Traditional Music Learning
While the fruit piano is undeniably fun and novel, it serves a deeper purpose in your child’s musical journey. This project shouldn’t replace structured music education but rather complement and enhance it.
Traditional music programs provide systematic skill development, theoretical understanding, and social learning experiences that technology experiments can’t replicate. Programs like those offered by The Music Scientist—from early sensory experiences in Tenderfeet: Infant Care Classes and Sensory Development through more advanced learning—build comprehensive musical foundations through developmentally appropriate progressions.
The fruit piano enriches this foundation by:
- Making abstract musical concepts tangible and visible
- Providing a novel entry point for reluctant musicians
- Reinforcing patterns and melodies learned in formal classes
- Building positive associations with music-making and creativity
- Demonstrating that music and technology can work together harmoniously
Think of the fruit piano as a bridge—it connects the structured learning of music classes with the free exploration of home play. It transforms your kitchen table into an innovation laboratory where music, science, and creativity intersect. Children who experience this kind of multidimensional learning develop flexibility in thinking and the ability to see connections across traditionally separate subjects.
When children understand that a banana can be both a nutritious snack and a piano key, they’re learning that objects and ideas can serve multiple purposes. This kind of flexible, creative thinking prepares them not just for academic success but for innovative problem-solving throughout their lives.
The true magic of the fruit piano isn’t in the technology itself—it’s in watching your child’s eyes light up when they realize they’ve created something impossible-seeming, when they understand they can be both musicians and scientists, when they discover that learning can be delicious, literally.
Creating a fruit piano with Makey Makey transforms ordinary produce into an extraordinary learning adventure. This simple yet powerful project engages multiple intelligences simultaneously—musical, logical-mathematical, kinesthetic, and verbal—while providing concrete, hands-on experiences that young children need for meaningful learning.
From toddlers experiencing their first cause-and-effect discoveries to kindergarteners exploring conductivity and composition, the fruit piano adapts beautifully across developmental stages. It complements formal music education by making abstract concepts tangible, reinforcing melodies learned in classes, and building positive associations with both music and STEM learning.
Most importantly, this activity embodies the joy of discovery. When children press a strawberry and hear music, they’re not just playing with technology—they’re developing confidence, curiosity, and the understanding that they can create, experiment, and innovate. These are the foundations of lifelong learning.
Ready to expand beyond fruit piano experiments into comprehensive music education that follows your child’s developmental journey? Explore how structured, research-based music programs can nurture your child’s growing abilities while building the cognitive, social, and emotional skills that prepare them for future success.
Nurture Your Child’s Musical and Cognitive Development
Discover how The Music Scientist’s developmentally-focused programs combine music, movement, and learning to support your child’s growth from infancy through preschool readiness.
Table Of Contents
- What Is a Bottle Xylophone?
- The Science Behind Pitch and Sound Waves
- What You’ll Need to Build Your Bottle Xylophone
- Step-by-Step Instructions
- How to Measure and Adjust Pitch
- Developmental Benefits for Young Learners
- Age-Appropriate Adaptations
- Extension Activities and Learning Opportunities
- Troubleshooting Common Challenges
Have you ever noticed how your child’s eyes light up when they discover they can make music from everyday objects? A bottle xylophone transforms simple glass bottles and water into a captivating musical instrument that teaches fundamental concepts about pitch, sound, and measurement—all while engaging young learners through hands-on exploration.
This delightful activity combines the wonder of music-making with scientific inquiry, making it perfect for parents and educators who want to nurture both musical and logical-mathematical intelligence in young children. Whether you’re looking for an engaging rainy-day project or a structured learning activity for your toddler or preschooler, building and playing a bottle xylophone offers rich developmental benefits that extend far beyond simple entertainment.
In this comprehensive guide, you’ll discover how to construct your own bottle xylophone, understand the science of pitch and sound waves, and learn age-appropriate ways to introduce measurement concepts to children as young as 18 months. We’ll also explore how this activity aligns with early childhood developmental milestones and supports multiple learning styles through sensory play, movement, and musical exploration.
🎵 Bottle Xylophone Quick Guide 🎵
Transform everyday bottles into a musical learning adventure!
🧪
The Science
More water = Higher pitch
Vibrations create sound waves. Less air space means faster vibrations and higher musical tones!
🎯
Age Range
18 months – 5 years
Perfect for toddlers through preschoolers with adaptations for each developmental stage
✓ What You’ll Need
🍾
5-8 Glass Bottles
💧
Water + Food Coloring
🥄
Wooden Spoons
📏
Measuring Cup
🚀 Simple Steps to Success
1
Arrange bottles in a row on a stable surface with towels underneath
2
Fill gradually from empty to nearly full (creates low to high pitch)
3
Test & adjust by tapping gently and fine-tuning water levels
4
Make music! Create patterns, compose songs, and explore sounds
🌟 Developmental Benefits
🎼 Musical Intelligence
Pitch discrimination, rhythm awareness, scale understanding
🧮 Math Thinking
Measurement, sequencing, patterns, cause-and-effect
✋ Fine Motor Skills
Hand-eye coordination, precision pouring, controlled tapping
🔬 Scientific Inquiry
Observation, prediction, testing hypotheses, drawing conclusions
👶 Age-Appropriate Adaptations
18-30 Months
Focus: Sensory exploration
Pre-fill bottles, use simple language, keep sessions brief (5-10 min)
2.5-3.5 Years
Focus: Active participation
Help pour water, make predictions, introduce comparative language
4+ Years
Focus: Complex concepts
Measure amounts, tune pitches, compose melodies, use notation
💡 Pro Tips for Success
★
Add rainbow food coloring to help children distinguish between notes visually
★
Tap bottles about one-third down from the rim for the clearest tone
★
Use thick-walled bottles or plastic containers for enhanced safety with toddlers
★
Create a simple notation system using colors or numbers to “write” and play songs
★
Integrate movement: assign different actions to different pitches for full-body learning
🎵 Ready to Nurture Musical Intelligence? 🎵
Discover how music-based learning supports holistic child development through expertly designed programs for ages 4-47 months
What Is a Bottle Xylophone?
A bottle xylophone is a simple percussion instrument made by filling glass bottles or jars with varying amounts of water to create different musical pitches. When you gently tap each bottle with a wooden stick or spoon, the vibrations produce distinct tones that can be arranged to form a musical scale. This DIY instrument has been a beloved science and music activity for generations, offering children a tangible way to see, hear, and understand the relationship between physical properties and sound.
Unlike commercial xylophones with fixed metal or wooden bars, a bottle xylophone is wonderfully adjustable. Children can actively participate in the tuning process, adding or removing water until they achieve the desired pitch. This hands-on involvement transforms passive observation into active learning, encouraging problem-solving skills and persistence as young musicians work to create harmonious sounds.
The beauty of this instrument lies in its accessibility. Most families already have the necessary materials at home, making it an inclusive activity that doesn’t require special equipment or significant financial investment. For early childhood educators and parents implementing music-based learning approaches, the bottle xylophone serves as an excellent introduction to foundational musical concepts like pitch discrimination, sequencing, and pattern recognition.
The Science Behind Pitch and Sound Waves
Understanding the science behind your bottle xylophone enriches the learning experience and helps you explain concepts to curious young minds. When you tap a bottle, you create vibrations that travel through the glass, water, and air inside the bottle. These vibrations produce sound waves that we perceive as musical tones or pitches.
The pitch you hear depends on the frequency of these vibrations, measured in hertz (Hz). Higher frequencies create higher pitches, while lower frequencies produce lower, deeper sounds. In your bottle xylophone, the amount of water directly affects this frequency. Bottles with less water have more air space, allowing the air column to vibrate more slowly, producing lower pitches. Conversely, bottles with more water have less air space, creating faster vibrations and higher pitches.
This inverse relationship between water level and pitch might seem counterintuitive at first—after all, adding more of something often increases rather than decreases a property. This apparent paradox creates a wonderful teaching moment for preschoolers beginning to explore cause-and-effect relationships. When children discover that adding water makes the sound go “up” (higher in pitch), they’re engaging in genuine scientific inquiry and developing critical thinking skills.
Making Science Accessible for Young Children
While the physics of sound can be complex, you can introduce these concepts in developmentally appropriate ways. For toddlers and young preschoolers, focus on sensory language: “Listen—this bottle sounds high like a bird singing,” or “This one sounds low and deep like a drum.” As children mature and their verbal skills develop, you can introduce simple comparative language: “Which bottle has more water? Does it make a higher or lower sound?”
What You’ll Need to Build Your Bottle Xylophone
Gathering your materials is the first step in this musical science adventure. The good news is that most items are readily available in your home or easily obtained from local stores. Here’s what you’ll need:
- Glass bottles or jars: 5-8 identical glass containers (wine bottles, beer bottles, or mason jars work beautifully). Using identical bottles ensures consistency in your sound production.
- Water: Tap water works perfectly fine, though you can add food coloring to create visual interest and help children distinguish between different notes.
- Striking tools: Wooden spoons, chopsticks, or drumsticks for tapping the bottles. Metal utensils create a sharper sound, while wooden implements produce a mellower tone.
- Measuring cup: For precise water measurements if you want to recreate specific pitches or document your scale.
- Funnel: Makes pouring water easier and reduces spills, especially when young children are participating.
- Food coloring (optional): Creates a rainbow effect that enhances visual learning and helps children remember which bottle produces which note.
- Towels or tray: To contain inevitable spills and protect surfaces during the experimentation process.
- Tuning app or piano (optional): For older children interested in creating an accurately tuned musical scale.
When selecting bottles, ensure they’re sturdy and free from cracks or chips. Safety is paramount when working with glass around young children, so always supervise closely and consider using thick-walled bottles that are less likely to break if accidentally knocked over.
Step-by-Step Instructions
Building your bottle xylophone is a process that encourages exploration and experimentation. While these steps provide structure, remember that the journey of discovery is just as valuable as the finished product. Allow time for children to explore, make predictions, and test their hypotheses throughout this activity.
1. Prepare Your Workspace – Set up your activity area on a stable surface like a kitchen table or floor space. Lay down towels or place bottles on a rimmed tray to catch water spills. Having a contained workspace helps children feel more confident during hands-on exploration and makes cleanup easier.
2. Arrange Your Bottles – Line up your glass bottles in a row, spacing them about 2-3 inches apart. This arrangement mimics the layout of a traditional xylophone and helps children understand sequencing concepts. If you’re using food coloring, this is the time to decide which colors will represent different pitches.
3. Start with the First Bottle – Leave your first bottle completely empty, or add just a tiny amount of water. This bottle will produce your lowest note. Tap it gently with your striking tool and listen to the deep, resonant sound it creates. Invite children to describe what they hear using their own words.
4. Fill Bottles with Increasing Water Levels – Gradually add more water to each subsequent bottle, creating a stepped progression from least to most water. For a basic pentatonic scale (which sounds pleasant even when notes are played randomly), try these approximate levels: empty, 1/4 full, 1/2 full, 3/4 full, and nearly full. The exact amounts will vary depending on your bottle size and desired pitch range.
5. Test and Listen – After filling several bottles, tap each one in sequence. Listen carefully to ensure each bottle produces a distinctly different pitch that’s higher than the previous one. This testing phase is where true learning happens, as children begin to recognize patterns and make connections between water level and pitch.
6. Adjust Water Levels – Based on what you hear, add or remove small amounts of water to fine-tune your pitches. This adjustment process teaches children about incremental change and the value of persistence in achieving desired results. Encourage them to make predictions: “If we add more water, will the sound be higher or lower?”
7. Add Visual Markers (Optional) – Once you’re satisfied with your pitches, you can mark the water levels with tape or permanent marker on the outside of the bottles. Adding food coloring in rainbow order (red for the lowest note through violet for the highest) creates a beautiful visual representation of the musical scale and supports memory development.
8. Create a Playing Space – Ensure your xylophone is on a stable, flat surface where it won’t be easily knocked over. Consider placing a non-slip mat underneath to prevent bottles from sliding during enthusiastic playing sessions.
How to Measure and Adjust Pitch
Measuring pitch can range from simple comparative listening suitable for toddlers to more precise tuning appropriate for older preschoolers showing strong musical interest. The approach you choose should match your child’s developmental stage and the learning objectives you’ve set for the activity.
Informal Pitch Measurement for Young Children
For children in programs like Happyfeet or Groovers, informal pitch discrimination is the primary goal. Focus on comparative language and sensory descriptions rather than precise measurements. Play two bottles and ask, “Which one sounds higher?” or “Can you find the bottle that sounds like a tiny mouse? Now find the one that sounds like a big bear!”
Encourage children to use their bodies to represent pitch changes. When they hear a low note, they can crouch down low; when they hear a high note, they can reach up tall. This kinesthetic approach reinforces pitch concepts through movement, engaging multiple learning modalities simultaneously and supporting the development of musical intelligence alongside bodily-kinesthetic intelligence.
Creating a Proper Musical Scale
For older preschoolers or those in advanced programs like Scouts, you might want to create an accurately tuned scale. A simple pentatonic scale (five notes) works beautifully and is commonly used in early childhood music education because all the notes sound harmonious together, even when played randomly.
To create a C major pentatonic scale, tune your bottles to these notes: C, D, E, G, and A. You can use a piano, keyboard app, or tuning app on your smartphone to match pitches. Tap a bottle, then compare its sound to the reference pitch. Add small amounts of water to raise the pitch or remove water to lower it. This process requires patience and careful listening—valuable skills that transfer to many other learning contexts.
For parents and educators without musical training, don’t worry about perfect pitch accuracy. Even an approximately tuned xylophone provides rich learning experiences. The process of trying to match pitches develops auditory discrimination skills that support language development, phonemic awareness, and eventually reading readiness.
Recording Your Measurements
For children ready to engage with early mathematical concepts, consider documenting your water measurements. Use a measuring cup to note how much water you added to each bottle, then record these amounts in a simple chart. This data collection introduces foundational skills in measurement, recording observations, and understanding that experiments can be replicated using recorded information.
Developmental Benefits for Young Learners
Creating and playing a bottle xylophone offers far more than simple entertainment. This multi-sensory activity supports development across multiple domains, making it an ideal addition to holistic early childhood education approaches that value music as a powerful learning medium.
Musical Intelligence Development: Children develop pitch discrimination, rhythm awareness, and basic understanding of musical scales and sequences. These foundational skills support later music reading, singing in tune, and appreciation of musical patterns. Even very young children in Tenderfeet programs benefit from exposure to varied pitches and tones, as these experiences shape auditory processing capabilities during critical developmental windows.
Logical-Mathematical Thinking: The bottle xylophone naturally introduces mathematical concepts including measurement, sequencing, patterns, and one-to-one correspondence. Children discover that adding more water consistently produces a predictable result (higher pitch), developing their understanding of cause-and-effect relationships. Comparing water levels and organizing bottles from lowest to highest pitch builds pre-math skills essential for later academic success.
Fine Motor Skills: Pouring water carefully, adjusting levels precisely, and tapping bottles with controlled force all develop hand-eye coordination and fine motor control. These skills directly support later abilities like writing, using utensils, and manipulating small objects—key developmental milestones monitored in comprehensive early childhood programs.
Language and Vocabulary Expansion: This activity introduces rich vocabulary including pitch, high, low, scale, vibration, frequency, louder, softer, and instrument names. Describing sounds and making predictions encourages verbal expression and builds the kind of academic language that supports school readiness—a key focus of programs like SMART-START English.
Scientific Inquiry Skills: Children learn to observe, predict, test hypotheses, and draw conclusions—the fundamental steps of the scientific method. When a child wonders, “What will happen if I add more water?” and then tests their prediction, they’re thinking like a scientist. This inquiry-based approach builds curiosity and confidence in their ability to understand how the world works.
Focus and Concentration: Tuning bottles and creating melodies requires sustained attention and careful listening. These experiences strengthen concentration abilities that transfer to other learning contexts, from story time to puzzle completion. The engaging, hands-on nature of the activity helps even easily distracted children maintain focus for extended periods.
Age-Appropriate Adaptations
One of the strengths of the bottle xylophone activity is its adaptability across developmental stages. By adjusting complexity, supervision levels, and learning objectives, you can make this activity appropriate for children from toddlerhood through early elementary years.
For Toddlers (18-30 months)
At this stage, focus on sensory exploration and simple cause-and-effect understanding. Pre-fill bottles yourself with varying water levels and bright food coloring. Allow toddlers to tap bottles under close supervision, emphasizing the connection between their action (tapping) and the result (sound). Use simple language: “You tapped it! It made a sound!” Keep sessions brief (5-10 minutes) to match shorter attention spans typical of this age group.
Consider using plastic bottles instead of glass for enhanced safety, though note that the sound quality will be different. Secure lids tightly to prevent water access, or conduct the activity during outdoor play where spills don’t matter. The primary learning goals at this age are sensory stimulation, cause-and-effect understanding, and basic exposure to varied pitches.
For Young Preschoolers (2.5-3.5 years)
Children in this age range can begin to participate more actively in the construction process. Let them help pour water (with guidance) and make predictions about what will happen. Introduce comparative language: “This bottle has more water. This one has less water. Which sound is higher?” They can begin to arrange bottles in order from lowest to highest pitch with your support.
At this stage, children benefit from narrative contexts that make the activity more engaging. Create a story: “We’re making music for the fairy queen! She needs a high sound for when she flies and a low sound for when she walks.” This imaginative play element maintains engagement while teaching musical concepts.
For Older Preschoolers (4+ years)
Children approaching school age can engage with more complex aspects of the activity. They can measure water amounts, record observations, attempt to tune bottles to specific pitches, and even compose simple melodies. Introduce number concepts by labeling bottles 1-5 or 1-8, then calling out numbers for children to play: “Play bottle 3, then bottle 1, then bottle 5.”
Older preschoolers enrolled in preschool readiness programs benefit from the literacy connections this activity offers. Write simple songs using numbers or colors: “Red, blue, yellow, blue” becomes a playable composition. This symbolic representation builds pre-reading skills and demonstrates how symbols can communicate information—a foundational literacy concept.
Extension Activities and Learning Opportunities
Once you’ve mastered the basic bottle xylophone, numerous extension activities can deepen learning and maintain engagement over time. These variations keep the activity fresh and continue to challenge developing skills.
Compose and Notate Simple Songs: Create a simple notation system using colors, numbers, or pictures. Write down sequences like “Red, blue, yellow, yellow, red” and help children “read” and play their compositions. This activity bridges music and literacy, showing that ideas can be recorded and recreated—a powerful concept for emergent readers.
Explore Different Materials: Try the same experiment with different containers—plastic bottles, metal cans, or ceramic mugs. Compare the sounds produced by different materials. This exploration introduces properties of matter and develops comparative thinking skills. Why does glass produce a clearer tone than plastic? What happens when you use hot water versus cold water?
Create Sound Patterns: Play simple rhythmic patterns on your xylophone: long-short-short, or high-low-high-low. Ask children to repeat the patterns they hear, developing auditory memory and pattern recognition. These skills directly support mathematical thinking and phonological awareness essential for reading development.
Integrate Movement: Assign different movements to different pitches. High notes might mean jumping, while low notes mean stomping. Play your xylophone while children respond with corresponding movements, creating a full-body musical experience that reinforces pitch concepts through kinesthetic learning.
Experiment with Blowing: In addition to tapping, try gently blowing across the tops of bottles (like playing a flute). You’ll notice that the pitch relationship reverses—bottles with more water now produce higher pitches when blown, while bottles with less water produce lower pitches. This fascinating discovery introduces more complex scientific concepts about air column vibration versus water vibration.
Document the Process: Take photos or videos at different stages of your xylophone construction. Create a sequence chart showing the process from beginning to end. This documentation activity supports memory development, sequencing skills, and provides material for later reflection and discussion about the learning experience.
Troubleshooting Common Challenges
Even with careful preparation, you may encounter challenges as you build and play your bottle xylophone. Understanding common issues and their solutions helps maintain momentum and prevents frustration.
Pitches Sound Too Similar: If your bottles don’t produce distinctly different pitches, increase the variation in water levels. Start with one bottle nearly empty and another nearly full to create maximum pitch contrast, then fill the bottles in between at evenly spaced intervals. Sometimes using larger bottles creates a more noticeable pitch range.
Bottles Produce Dull or Unclear Sounds: Ensure you’re tapping the bottle firmly enough to produce clear vibrations, but not so hard that you risk breaking the glass. Try tapping at different heights on the bottle—often tapping about one-third down from the rim produces the clearest tone. Also check that bottles are completely clean, as residue can dampen vibrations.
Water Levels Keep Changing: If you’re working in a warm environment, water may evaporate noticeably over several days. Consider covering bottles with plastic wrap between play sessions, or simply accept that occasional retuning is part of the activity. For children, this provides additional practice with pitch discrimination and adjustment skills.
Child Loses Interest Quickly: Young children’s attention spans vary considerably. If engagement wanes, shift focus to a different aspect of the activity—from construction to performance, from scientific exploration to creative composition. Sometimes putting the activity away and returning to it the next day refreshes interest. Remember that even brief exposures to musical and scientific concepts accumulate developmental benefits over time.
Safety Concerns with Glass: If you’re worried about glass breaking, transition to thick-walled glass bottles or food-safe plastic containers. While the sound quality differs, the fundamental learning about pitch relationships remains intact. Always supervise young children closely during any activity involving glass, and teach respectful handling of materials.
Creating a bottle xylophone offers a perfect blend of music, science, and hands-on exploration that captivates young learners while supporting crucial developmental milestones. This simple yet profound activity demonstrates how everyday materials can become powerful learning tools when approached with curiosity and intentionality. As children pour water, listen carefully to pitch variations, and experiment with creating musical sequences, they’re developing skills across multiple intelligences—from musical and logical-mathematical to kinesthetic and linguistic.
The beauty of this activity lies not just in the finished instrument, but in the process of discovery itself. When a child’s face lights up with understanding as they connect water level to pitch, or when they proudly perform their first self-composed melody, you’re witnessing genuine learning that extends far beyond a single activity. These moments of discovery build confidence, curiosity, and a love for both music and scientific inquiry that can last a lifetime.
Whether you’re a parent seeking enriching activities for home learning or an educator implementing developmentally appropriate curriculum, the bottle xylophone exemplifies how music can serve as a powerful medium for holistic child development. The skills children practice while building and playing this instrument—careful observation, patient adjustment, creative expression, and joyful experimentation—are precisely the capabilities that support school readiness and lifelong learning success.
Ready to nurture your child’s musical intelligence and cognitive development through expertly designed, age-appropriate programs? At The Music Scientist, we specialize in using music as a powerful learning medium to support early childhood development across multiple intelligences. Our programs combine music, movement, and hands-on exploration to promote cognitive growth, motor skills, and school readiness for children aged 4 to 47 months. Contact us today to learn how our developmentally-focused music enrichment classes can support your child’s learning journey and foster a lifelong love for both music and discovery.
Table Of Contents
- What Is Sonic Pi?
- Why Coding Music Matters for Child Development
- The Perfect Age to Start with Sonic Pi
- Educational Benefits Beyond Music and Code
- Getting Started: What You’ll Need
- Creating Your Child’s First Sounds
- Building Skills: A Natural Learning Progression
- Tips for Parents Supporting Young Coders
- Beyond the Basics: Where Sonic Pi Can Lead
Imagine your child composing an entire symphony by typing just a few lines of text. Not through traditional musical notation, but through code—instructions that a computer transforms into melodies, rhythms, and harmonies. This isn’t science fiction; it’s the reality that Sonic Pi brings to children’s fingertips, merging two seemingly different worlds: music creation and computer programming.
For parents who’ve witnessed how music nurtures young minds during the early years, Sonic Pi represents an exciting next chapter in your child’s learning journey. It builds upon the musical foundation established in early childhood—where rhythm, melody, and creative expression first took root—and extends it into the digital age. More than just a coding tool or music software, Sonic Pi is a platform where logical thinking meets artistic expression, where mathematical patterns create beautiful sounds, and where children discover that creativity and technology aren’t opposites but partners.
Whether your child has grown up with music classes or is just beginning to explore their creative potential, Sonic Pi offers a unique gateway into both computational thinking and musical composition. Let’s explore how this innovative tool can unlock new dimensions of learning, creativity, and confidence for the young learners in your life.
Sonic Pi: Where Code Meets Creativity
A Visual Guide to Music Coding for Kids
🎵 What Is Sonic Pi?
A free, open-source programming environment that transforms typed code into beautiful music. Kids learn coding and music composition simultaneously through instant audio feedback.
Key Learning Benefits
🎼
Musical Intelligence
Explore pitch, rhythm, and harmony through hands-on creation
🧮
Logical Thinking
Master loops, sequences, and mathematical patterns
🎯
Problem Solving
Debug code, iterate ideas, and build resilience
Perfect Age & Readiness
Ideal Starting Age
7-8 years+ with reading & basic math skills
Musical Foundation Helps
Prior music exposure accelerates learning
Younger Learners
Can explore with parent collaboration
100%
Free & accessible
No expensive equipment needed
Getting Started Checklist
✓ Computer
Windows, Mac, or Linux
✓ Audio Output
Speakers or headphones
✓ Free Download
sonic-pi.net
✓ Curiosity
Ready to explore!
Learning Progression Path
1
First Sounds
Simple notes and melodies with instant feedback
2
Loops & Patterns
Create repeating rhythms and discover programming power
3
Layering & Threads
Combine multiple musical elements simultaneously
4
Advanced Effects
Professional sound design with reverb, filters, and more
Parent Tips for Success
✨ Embrace exploration🎯 Celebrate process over product⏰ Create regular creative time🔗 Connect to their interests🎉 Share their creations
🌟 Building Tomorrow’s Creators Today
Sonic Pi bridges logical thinking and artistic expression, showing children that creativity and technology are perfect partners in learning and innovation.
What Is Sonic Pi?
Sonic Pi is a free, open-source programming environment designed specifically for creating music through code. Developed by Dr. Sam Aaron at the University of Cambridge, it was built with education in mind—making both programming and music composition accessible to complete beginners while remaining powerful enough for professional musicians and live performers.
Unlike traditional music software where you click buttons or play virtual instruments, Sonic Pi uses a text-based coding language. Children type commands like play 60 or sample :drum_bass_hard, and the computer immediately transforms these instructions into sound. This direct cause-and-effect relationship makes the abstract concept of coding tangible and immediately rewarding. When your child presses “Run,” they don’t just see results on a screen—they hear them, creating a multisensory learning experience that engages both analytical and creative thinking.
What makes Sonic Pi particularly brilliant for children is its instant feedback loop. There’s no complicated setup, no waiting for compilation, and no confusing error messages that discourage young learners. The software was intentionally designed to be forgiving and encouraging, allowing children to experiment freely, make mistakes without consequence, and discover the joy of creation through trial and exploration.
Why Coding Music Matters for Child Development
The intersection of music and coding creates a uniquely powerful learning environment that activates multiple areas of child development simultaneously. When children code music, they’re not simply learning two separate skills—they’re experiencing how different forms of knowledge interconnect and reinforce each other in meaningful ways.
Musical intelligence develops as children explore pitch, rhythm, tempo, and harmony through experimentation. Unlike passive music listening, creating music through code requires active decision-making about every sonic element. Children learn to recognize patterns in melodies, understand how rhythm creates structure, and discover how different sounds combine to create mood and meaning. These musical concepts become concrete and manipulable rather than abstract and mysterious.
Logical-mathematical thinking flourishes because music itself is inherently mathematical. When a child codes a repeating drum pattern, they’re working with loops and sequences. When they create a melody that ascends in regular intervals, they’re applying mathematical patterns. Sonic Pi makes these connections explicit and experiential, helping children understand that mathematics isn’t just about numbers on paper—it’s about patterns, relationships, and structures that appear throughout the world, including in the music they love.
The kinesthetic dimension shouldn’t be overlooked either. While coding might seem sedentary, children often move to the music they create, testing rhythms with their bodies and using physical intuition to guide their coding decisions. This mirrors the approach used in early childhood music programs where movement and music are inseparable partners in learning.
Perhaps most importantly, coding music develops creative problem-solving skills. When a child has a musical idea in their head but must figure out how to translate it into code, they’re engaging in authentic problem-solving. They must break down complex ideas into simple steps, debug when things don’t sound right, and iterate until their creation matches their vision. These are precisely the thinking skills that prepare children for challenges across all academic subjects and life situations.
The Perfect Age to Start with Sonic Pi
While Sonic Pi is accessible to learners of all ages, children typically find the most success when they’re around seven to eight years old and beyond. At this developmental stage, children have usually developed sufficient reading skills to understand basic commands, enough mathematical understanding to grasp concepts like numbers and sequences, and the patience to work through challenges that require multiple steps to solve.
That said, the “perfect” age varies significantly based on individual readiness rather than a specific number. A child who has been immersed in music education from an early age—perhaps through programs like those offered at Scouts or Groovers—often brings a musical vocabulary and confidence that accelerates their Sonic Pi learning. They already understand concepts like tempo, rhythm, and pitch, which means they can focus their cognitive energy on the coding aspects rather than trying to grasp both music and programming simultaneously.
For younger children who show intense interest but aren’t quite ready for independent coding, Sonic Pi can still be explored together with a parent or older sibling. The adult can handle the typing while the child makes creative decisions about what sounds to use, creating a collaborative learning experience that builds excitement for future independent exploration.
Educational Benefits Beyond Music and Code
The learning that happens through Sonic Pi extends far beyond the immediate skills of music creation and programming. Children develop a constellation of competencies that serve them across their entire educational journey and beyond.
Sequential thinking becomes second nature as children learn that the order of their code matters. A drum beat followed by a melody creates a different effect than a melody followed by a drum beat. This understanding of sequence and consequence transfers directly to writing (organizing ideas logically), mathematics (following multi-step procedures), and science (understanding cause and effect in experiments).
Attention to detail develops naturally because small differences in code create significant differences in sound. Missing a single character or using the wrong number can completely change the musical output. Rather than this precision being tedious, it becomes meaningful because children immediately hear the results of their attention or inattention. This creates intrinsic motivation for careful work that often transfers to other subjects where precision matters.
Persistence and resilience grow through the debugging process. Code rarely works perfectly on the first attempt, and children learn that errors aren’t failures—they’re information. When a piece of code produces unexpected sounds, children develop the habit of analyzing what went wrong, adjusting their approach, and trying again. This growth mindset, where challenges are seen as opportunities rather than obstacles, is one of the most valuable gifts education can provide.
Working with Sonic Pi also strengthens verbal and written communication skills. As children become more sophisticated coders, they begin commenting their code—writing notes to themselves explaining what different sections do. They share their creations with others and need to explain their process. They read documentation and tutorials, connecting written language with practical application. These literacy practices happen in a context that feels purposeful and engaging rather than obligatory.
Getting Started: What You’ll Need
One of Sonic Pi’s greatest strengths is its accessibility. The barrier to entry is remarkably low, making it possible for nearly any family to begin exploring coding music without significant investment.
Computer requirements:
- A relatively modern computer (Windows, Mac, or Linux—Sonic Pi works on all three)
- Speakers or headphones (essential for hearing your creations)
- An internet connection for downloading the software (it’s free)
- No special hardware, MIDI keyboards, or expensive equipment required
Software setup:
- Download Sonic Pi from the official website (sonic-pi.net)
- Installation is straightforward with simple instructions
- The entire environment is contained in one application—no complex configurations needed
- Built-in tutorials guide learners through their first experiences
Learning resources:
- Sonic Pi’s built-in tutorial takes children from absolute beginner to creating complex compositions
- The help system includes examples for every command, allowing children to learn by exploring and modifying existing code
- Online communities share projects and offer encouragement
- Books and video tutorials are available for different learning preferences
Perhaps most importantly, you don’t need to be a programmer or musician yourself to support your child’s exploration. Sonic Pi was designed for learners, which means parents and children can discover together, asking questions, experimenting, and celebrating successes as a team.
Creating Your Child’s First Sounds
The magic of Sonic Pi reveals itself within minutes of opening the application. The interface is clean and unintimidating: a large text area where code is written, a “Run” button that brings code to life, and helpful panels with documentation and examples. For a child’s first experience, simplicity creates confidence.
1. The first note – Type play 60 and press Run. A single piano note sounds—middle C, to be precise. This simple achievement is profound: your child has just used code to create music. The number 60 is a MIDI note number, but children don’t need to understand the technicalities immediately. They simply need to know that different numbers create different pitches, and experimenting with numbers reveals higher and lower notes.
2. Creating a melody – Once the first note brings a smile, children naturally want more. Adding lines of code creates a sequence: play 60, play 64, play 67 produces three notes in succession—the beginning of a melody. Children quickly discover they’re composing, choosing which notes follow which, creating their own musical phrases through the simple act of typing numbers.
3. Adding rhythm – Music needs time to breathe. The command sleep 1 creates a pause, and children learn to place these pauses between notes to create rhythm. They experiment with different sleep durations—0.5 for quick notes, 2 for longer pauses—and discover how rhythm transforms a series of pitches into actual music with character and feeling.
4. Exploring sounds – Beyond simple notes, Sonic Pi includes dozens of synthesizers and hundreds of samples (pre-recorded sounds). Children can switch from piano to drums, from strings to electronic beeps, discovering that the same melody sounds completely different when the timbre changes. This exploration of sound color develops their musical palette while keeping engagement high through variety and novelty.
These first experiences should be playful and exploratory rather than instructional. Allow your child to experiment freely, make “mistakes” that result in interesting sounds, and follow their curiosity wherever it leads. The best learning happens when children are driven by their own questions: “What happens if I use really big numbers?” “Can I make it sound like a robot?” “How do I make it faster?”
Building Skills: A Natural Learning Progression
As children grow comfortable with basic commands, Sonic Pi reveals deeper layers of possibility, each building naturally on previous knowledge. This progressive complexity keeps the learning fresh and challenging without becoming overwhelming.
Loops and repetition introduce children to one of programming’s most powerful concepts. Instead of typing the same code repeatedly, they learn to wrap it in a loop that plays automatically. When a child creates a four-beat drum pattern and then loops it, they’ve essentially created an infinite rhythm—their first experience with how a small piece of code can create something much larger than itself.
Variables and randomness open creative possibilities that feel almost magical. Children can create code where the computer chooses random notes within a specified range, generating music that’s different every time it runs. This introduces probability and variation while creating musical surprises that delight both the coder and their audience.
Threads and layering allow multiple musical elements to play simultaneously. A child might code a bass line in one thread, a melody in another, and a drum pattern in a third, learning how to coordinate different musical voices into a cohesive composition. This mirrors the concept of orchestration in traditional music but with the added complexity of coordinating multiple code threads—a sophisticated programming concept made accessible through music.
Effects and sound design become available as children advance, allowing them to apply reverb, distortion, filtering, and other audio effects to their sounds. This transforms their compositions from simple beeps to rich, professional-sounding productions, providing tremendous satisfaction and motivation to continue developing their skills.
Throughout this progression, children aren’t following a rigid curriculum but rather discovering new tools when they need them to express their musical ideas. This need-driven learning creates deeper understanding and retention than prescribed lessons ever could.
Tips for Parents Supporting Young Coders
Your role as a parent isn’t to become a Sonic Pi expert but to create an environment where exploration, experimentation, and creative expression thrive. The same principles that guide effective early childhood education—like those embedded in programs at SMART-START English—apply equally to coding music.
Embrace the exploratory mindset. Resist the urge to direct your child’s learning with specific goals or outcomes. Instead, ask open-ended questions: “What are you trying to create?” “What happens if you change that number?” “How does that sound make you feel?” These questions encourage reflection and metacognition—thinking about thinking—which deepens learning far more than step-by-step instructions.
Celebrate the process, not just the product. When your child shares their creation, show interest in how they made it, what challenges they encountered, and what they learned along the way. This reinforces that learning is valuable in itself, not just the final composition. It also builds the persistence needed for tackling more complex projects in the future.
Create a regular creative time. Like any skill, coding music benefits from consistency. Designating a regular time for Sonic Pi exploration—perhaps a Saturday morning routine or an after-dinner creative session—builds the habit of creative practice without the pressure of performance or perfection.
Connect to their existing interests. If your child loves a particular song, suggest trying to recreate a portion of it in Sonic Pi. If they’re interested in video games, explore how game music uses repetitive patterns and variations. Making connections between Sonic Pi and their existing passions increases engagement and demonstrates the relevance of what they’re learning.
Share their creations. Encourage your child to play their compositions for family members, record them, or share them with friends who are also learning. This transforms coding from a solitary activity into a social experience, building communication skills and confidence while creating a sense of accomplishment that motivates continued learning.
Beyond the Basics: Where Sonic Pi Can Lead
What begins as playful experimentation with sounds and code can evolve into sophisticated musical and computational skills that serve children throughout their education and potentially into career paths they might not have imagined existed.
Many young Sonic Pi users progress to live coding performances, where they create and modify music in real-time in front of an audience. This performance aspect combines the thrill of live music with the intellectual challenge of programming, creating a unique artistic expression that’s distinctly contemporary. Some schools and communities host live coding events where young programmers showcase their skills, building confidence and stage presence alongside technical abilities.
The programming concepts learned through Sonic Pi transfer directly to other coding languages and environments. The logical thinking, debugging skills, and understanding of loops, variables, and functions all apply whether a child eventually moves toward web development, game design, robotics, or data science. Sonic Pi serves as a welcoming gateway into the broader world of computational thinking.
For musically inclined children, Sonic Pi can deepen their understanding of music theory in ways that traditional instruction sometimes struggles to achieve. When you code a major scale, you see the mathematical relationship between the notes. When you program chord progressions, you understand the patterns that make certain combinations sound harmonious. This analytical understanding complements emotional musical expression, creating well-rounded musical knowledge.
Some children discover that their passion lies at this intersection of technology and art, leading toward fields like audio engineering, music technology, interactive media design, or computational creativity. Others simply carry forward the joy of making something from nothing—the empowering realization that with curiosity, persistence, and the right tools, they can bring their ideas to life.
Sonic Pi represents more than just an introduction to coding or a novel way to create music—it’s a bridge between analytical and creative thinking, a space where logical patterns and artistic expression dance together in perfect harmony. For children who have grown up understanding music as a powerful learning medium, perhaps through early experiences with programs like Tenderfeet or Happyfeet, Sonic Pi offers a natural next step in their developmental journey.
The beauty of coding music lies in its democratic nature. Every child, regardless of whether they’ve had formal music training or prior programming experience, can find success and joy in Sonic Pi. The software meets learners where they are, grows with them as they develop new skills, and never stops offering new challenges and creative possibilities to explore.
As parents, our role is to provide the tools, create the space, and nurture the curiosity that makes this learning possible. When we do, we’re not just teaching our children to code or compose—we’re showing them that learning itself can be creative, playful, and deeply satisfying. We’re demonstrating that different forms of knowledge aren’t separate subjects in isolated boxes but interconnected ways of understanding and engaging with the world.
The melodies your child codes today might be simple, just a few notes and a basic rhythm. But within those simple creations lies something profound: the beginning of a journey where imagination meets logic, where ideas become reality, and where your child discovers the joy of making music through the language of technology.
Nurture Your Child’s Musical Journey from the Start
While Sonic Pi opens exciting possibilities for older children, the foundation for musical learning begins much earlier. At The Music Scientist, we’ve spent years developing programs that use music as a powerful medium for early childhood development, building the musical understanding and creative confidence that makes later exploration of tools like Sonic Pi even more successful.
Whether your child is just beginning their musical journey or ready to explore new dimensions of learning, we’re here to support their growth every step of the way.
Table Of Contents
Watch any group of young children, and you’ll notice something remarkable: they naturally move to rhythm. A toddler spontaneously bouncing to music, a baby’s eyes widening at rhythmic clapping, a preschooler’s delight in repeating patterned sounds—these aren’t just adorable moments. They’re powerful learning opportunities where mathematical concepts take root through the universal language of rhythm.
The connection between rhythm and mathematics runs deeper than many parents and educators realize. When children clap and count together, they’re simultaneously processing temporal patterns, understanding one-to-one correspondence, and developing the neural pathways that support logical thinking. This multisensory approach to early math education engages kinesthetic, musical, and logical intelligences simultaneously, creating rich developmental experiences that traditional counting methods alone cannot provide.
For babies, toddlers, and preschoolers aged 4 to 47 months, clap and count activities offer a developmentally appropriate entry point into mathematical thinking. These activities don’t just teach numbers—they build the foundational understanding of rhythm, pattern, sequence, and quantity that will support all future mathematical learning. This article provides comprehensive, age-specific lesson plans that combine rhythm, movement, and counting to nurture early math skills while fostering confidence and joy in learning.
Why Rhythm Matters for Early Math Development
Rhythm and mathematics share a fundamental relationship that begins forming in infancy. Both disciplines involve pattern recognition, sequencing, and the understanding of relationships between units. When young children engage with rhythmic activities, they’re developing the same cognitive skills that will later help them understand addition, subtraction, and even complex algebraic thinking.
Research in early childhood neuroscience reveals that musical rhythm activates multiple brain regions simultaneously, including areas responsible for motor control, auditory processing, and mathematical reasoning. This cross-activation creates stronger neural connections than single-modality learning approaches. When a toddler claps while counting, they’re creating a physical memory of numerical concepts that becomes embedded in their kinesthetic understanding.
The predictability of rhythm also provides an essential scaffold for learning. Young children thrive on patterns and repetition, which help them anticipate what comes next and actively participate in their learning. A steady clapping rhythm creates a framework where counting feels natural and inevitable, rather than abstract or forced. This emotional comfort with mathematical concepts at an early age establsbishes a positive foundation that can last a lifetime.
Furthermore, rhythm-based math activities honor how young children naturally learn—through their bodies and senses. Before children can understand abstract numerical symbols, they need concrete, physical experiences with quantity and pattern. Clapping provides that tangible connection, turning invisible mathematical concepts into something children can see, hear, and feel.
The Developmental Benefits of Clap and Count Activities
Integrating rhythm with early numeracy creates multidimensional learning experiences that support development across several domains. These benefits extend well beyond mathematical understanding, touching on physical, cognitive, social, and emotional growth.
Cognitive Development
Clap and count activities strengthen working memory as children must remember both the rhythm pattern and the counting sequence simultaneously. This dual-processing requirement builds cognitive flexibility and attention span. Children learn to hold multiple pieces of information in their minds while coordinating physical actions—a skill fundamental to all academic learning. Pattern recognition skills develop naturally as children notice the repeating structures in rhythmic counting games, laying groundwork for understanding mathematical sequences, musical composition, and even language syntax.
Physical Development
The motor skills required for clapping—bilateral coordination, rhythm synchronization, and controlled movement—support overall physical development. For infants and young toddlers, assisted clapping exercises strengthen shoulder stability and midline crossing abilities. Older toddlers and preschoolers refine their timing and develop the ability to independently produce consistent rhythmic patterns, which directly correlates with improved handwriting readiness and fine motor control.
Language and Literacy Development
Rhythm is intrinsically connected to language development. The prosody of speech—its rhythm, stress, and intonation—shares structural similarities with musical rhythm. When children engage in rhythmic counting, they’re developing phonological awareness and understanding syllabic patterns. These skills directly transfer to reading readiness, as children who can identify and reproduce rhythmic patterns typically find it easier to segment words into syllables and recognize rhyming patterns.
Social-Emotional Development
Group clapping and counting activities create opportunities for social bonding and emotional regulation. The shared rhythm provides a unifying experience that helps children feel connected to their peers and caregivers. Successfully participating in these activities builds confidence and creates positive associations with learning. For children who may feel anxious about academic concepts, the playful, musical nature of clap and count activities reduces pressure and makes mathematical learning feel joyful rather than evaluative.
Getting Started: Essential Elements for Success
Before diving into specific lesson plans, understanding the foundational elements that make rhythm-based counting activities effective will help you implement them successfully with young learners.
Consistency and Tempo: Young children need steady, predictable rhythms. Start with slower tempos (around 60-80 beats per minute) for infants and young toddlers, gradually increasing to 100-120 beats per minute for older preschoolers. The key is maintaining consistency—irregular rhythms confuse rather than support learning.
Multisensory Integration: Effective lessons engage multiple senses simultaneously. Combine clapping with visual cues (such as colorful scarves or instruments), verbal counting, and when appropriate, movement like stomping or swaying. This multisensory approach accommodates different learning styles and creates stronger memory formation.
Developmental Appropriateness: Respect each child’s developmental stage. Infants benefit from observing and experiencing assisted clapping, while preschoolers can handle complex patterns and higher number ranges. Never push children beyond their capabilities, as this creates negative associations with both music and mathematics.
Repetition with Variation: Children need multiple exposures to the same activities to internalize concepts, but they also need novelty to maintain engagement. Repeat core activities regularly while introducing small variations—changing the clapping style, adding new instruments, or incorporating different movements.
What You’ll Need:
- A quiet, comfortable space with room for movement
- Age-appropriate rhythm instruments (shakers, drums, bells)
- Visual aids such as number cards or counting props
- Recorded music or your own voice for consistent rhythm
- Positive, encouraging attitude and patience
Age-Appropriate Lesson Plans
Infants (4-12 Months): Rhythmic Foundations
At this stage, the focus is on sensory exposure and creating positive associations with rhythm and sound. Infants are developing auditory discrimination and beginning to understand cause and effect, making this an ideal time to introduce gentle rhythmic experiences.
Lesson Plan: Clap-Along Lap Songs
Duration: 5-7 minutes
Objective: Introduce steady beat awareness and create associations between sound, movement, and social interaction
Step-by-Step Process:
1. Settling In – Position the infant comfortably on your lap, facing outward or toward you depending on their preference and developmental stage. Make eye contact and speak softly to establish connection and comfort before beginning the activity.
2. Establishing the Beat – Begin clapping slowly and steadily (approximately 60 beats per minute) while maintaining eye contact with the infant. The rhythm should be calm and predictable, creating a secure auditory environment.
3. Adding Verbal Counting – Once the infant shows engagement (widening eyes, focusing on your hands, or stilling their movements), add simple counting: “One, two, one, two” in rhythm with your claps. Use an animated, melodic voice to maintain interest.
4. Assisted Participation – Gently take the infant’s hands and help them clap together in rhythm with your counting. This should be gentle and responsive—if the infant shows distress, return to simply clapping yourself while they observe.
5. Musical Integration – Sing a simple counting song like “One, Two, Buckle My Shoe” while maintaining the clapping rhythm. The melody provides additional auditory structure and makes the activity more engaging.
6. Wind Down – Gradually slow the tempo and soften the volume, preparing the infant for the transition to the next activity. End with a gentle squeeze or cuddle to positively reinforce the experience.
This foundational activity supports the development of temporal awareness and introduces the concept that sounds can be organized in predictable patterns. The Tenderfeet program incorporates similar sensory-rich musical experiences designed specifically for infants, supporting cognitive development through carefully structured musical play.
Young Toddlers (12-24 Months): Active Participation
Toddlers in this age range are developing independence and motor control. They’re beginning to imitate actions more precisely and can follow simple one-step instructions. Their attention spans remain short (typically 3-5 minutes for focused activities), so lessons should be energetic and allow for movement.
Lesson Plan: Clap and Count Circle Time
Duration: 8-10 minutes
Objective: Develop one-to-one correspondence between claps and numbers, encourage independent clapping, and introduce counting to three
Step-by-Step Process:
1. Opening Ritual – Gather children in a circle (seated or standing based on group energy level). Begin with a familiar welcome song that includes clapping to establish the activity framework and prepare children for participation.
2. Demonstration Phase – Model the activity clearly: clap once while saying “one” enthusiastically, pause, then clap again while saying “two,” pause, then clap while saying “three.” Use exaggerated movements and facial expressions to maintain engagement.
3. Guided Practice – Invite children to join you, counting together: “Let’s clap together! Ready? One (clap), two (clap), three (clap)!” Repeat this 3-4 times, maintaining a steady, moderate tempo that gives children time to coordinate their movements.
4. Pattern Variation – Introduce a simple pattern variation: “This time, we’ll clap LOUD, soft, LOUD. Ready? One (loud clap), two (soft clap), three (LOUD clap)!” This adds cognitive complexity while maintaining the counting framework.
5. Body Percussion Addition – Expand beyond hands: “Now we’ll clap one, tap our legs for two, and stomp for three!” This whole-body engagement helps children who are more kinesthetically oriented and adds novelty to sustain attention.
6. Instrument Exploration – Distribute simple rhythm instruments (shakers, bells, small drums). “Let’s count and shake! One (shake), two (shake), three (shake)!” The instrumental variation reinforces that the counting rhythm can be expressed through different sounds.
7. Closing Ritual – End with a calming activity: slow clapping while counting down “Three (clap), two (clap), one (clap), all done!” and bringing hands together in front of the chest. This signals the end of the activity and helps with transition.
This age group thrives in the Happyfeet program, which builds on natural toddler curiosity through music, movement, and sensory exploration designed for 18-month-olds and their developing independence.
Older Toddlers (24-36 Months): Pattern Recognition
Children in this developmental stage are rapidly expanding their verbal abilities and can follow multi-step instructions. They’re beginning to understand abstract concepts and can typically count to five or higher with support. Their improved motor control allows for more complex rhythmic patterns.
Lesson Plan: Pattern Clap Adventures
Duration: 12-15 minutes
Objective: Recognize and reproduce rhythmic patterns, count to five reliably, understand pattern sequences, and develop memory for multi-step activities
Step-by-Step Process:
1. Warm-Up Sequence – Begin with a familiar counting song from previous sessions, establishing comfort and readiness. Progress through counting to five with steady claps, ensuring all children are engaged and following the rhythm before introducing new concepts.
2. Pattern Introduction – Introduce the concept of patterns: “Today we’re going on a pattern adventure! A pattern is something that repeats. Let’s try: clap-clap-tap (legs), clap-clap-tap. Can you hear how it repeats?” Demonstrate slowly multiple times before inviting participation.
3. Pattern Practice – Practice the simple pattern with counting integration: “Let’s count our pattern! One-two (clap-clap), three (tap). One-two (clap-clap), three (tap).” Repeat 5-6 times, using visual cues like nodding or hand movements to support children who need additional guidance.
4. Pattern Variations – Introduce variations on the base pattern: “Now let’s try a different pattern: loud-soft-soft (clap-clap-clap), loud-soft-soft. Count with me: One (loud), two (soft), three (soft)!” Creating variations maintains engagement while reinforcing the concept that patterns can change but still maintain structure.
5. Story Integration – Create a simple narrative: “The bunny hops one-two-three (hop in place while counting), then claps one-two-three (clap while counting). What does the bunny do? Hops and claps!” Repeat the bunny’s pattern 3-4 times, then introduce a new animal with a different pattern.
6. Number Visualization – Hold up number cards (1, 2, 3) while clapping and counting. This visual reinforcement helps children begin connecting the abstract symbol with the quantity and the physical action. Point to each number as you clap, creating a multisensory learning moment.
7. Creative Exploration – Invite children to suggest their own patterns: “Can you make up a pattern for us?” Support their creativity even if their patterns aren’t perfectly structured—the creative process itself is valuable learning.
8. Cool-Down Review – Review the patterns learned today with slower tempo: “Let’s remember our patterns nice and slowly…” End with gentle hand motions that bring energy down and prepare children for the next transition.
The Groovers program offers age-appropriate music and dance classes perfect for this developmental stage, where toddlers refine their coordination and explore more complex musical concepts through joyful movement.
Preschoolers (36-47 Months): Mathematical Thinking
Preschoolers possess significantly more cognitive capacity for abstract thinking and can typically count to ten or beyond. They understand the concept of more and less, can identify numerals, and are beginning to grasp simple addition and subtraction concepts. Their improved attention spans (10-15 minutes) allow for more elaborate activities with multiple components.
Lesson Plan: Rhythm Math Explorers
Duration: 15-18 minutes
Objective: Apply counting skills to problem-solving, understand simple addition through rhythm, develop complex pattern creation, and build mathematical vocabulary
Step-by-Step Process:
1. Mathematical Warm-Up – Begin with counting review using rhythmic clapping from one to ten. Introduce mathematical language: “Let’s count forward to ten, then backward from five. Forward means going up in numbers, backward means going down.” This vocabulary building supports future mathematical learning.
2. Addition Through Rhythm – Introduce simple addition: “If we clap two times (clap-clap) and then clap two more times (clap-clap), how many claps did we do altogether? Let’s count: one, two, three, four! Two plus two equals four!” Write the equation visually (2 + 2 = 4) on a board if available.
3. Story Problem Integration – Create narrative math problems: “The bird had three seeds (clap three times while counting). Her friend gave her two more seeds (clap two times while counting). Now she has… let’s count all the claps… five seeds! Three plus two equals five.” Use props or pictures to reinforce the story.
4. Pattern Composition – Challenge children to create complex patterns: “Can you make a pattern that has four claps and two stomps? Let’s try together: clap-clap-clap-clap, stomp-stomp. Count the claps: one, two, three, four. Count the stomps: one, two. Four and two!” Allow children to demonstrate their own patterns to the group.
5. Echo Clapping Challenges – Perform a rhythm pattern (e.g., clap-clap-pause-clap-clap-clap) and have children echo it back, then count together how many claps were in the pattern. This develops auditory memory while reinforcing counting skills: “How many claps did you hear? Let’s do it again and count!”
6. Group Rhythm Creation – Divide children into two groups. One group claps a pattern while counting (e.g., four claps), the other group responds with a different number (e.g., three claps). Combine them: “Group one did four claps, group two did three claps. Altogether that’s seven claps! Four plus three equals seven!”
7. Instrument Orchestration – Distribute different instruments to different children. Assign each instrument a number: “Bells, you play three times. Drums, you play two times. Shakers, you play four times.” Conduct the group, then count the total sounds produced: “Three plus two plus four equals… let’s count together!”
8. Reflection and Review – Gather children together: “Today we counted, we made patterns, and we added numbers using rhythm! What was your favorite part?” This metacognitive reflection helps solidify learning and builds communication skills.
9. Closing Challenge – End with an age-appropriate challenge: “Tomorrow, try to find patterns in your day. Maybe you brush your teeth in a pattern: up-down-up-down. Maybe you take steps in a pattern. Can you count your patterns?” This extends learning beyond the classroom.
Preschoolers ready for more advanced cognitive challenges thrive in programs like Scouts, which fosters a love for science through catchy melodies and structured learning, or the comprehensive preschool readiness programs SMART-START English and SMART-START Chinese, which prepare children for seamless transitions into formal education.
Extension Activities and Variations
Once children are comfortable with basic clap and count activities, introducing variations keeps engagement high while deepening mathematical understanding. These extensions can be adapted for different age groups by adjusting complexity and expectations.
Body Percussion Exploration: Expand beyond clapping to create full-body counting experiences. Children can count while patting heads, tapping shoulders, touching toes, or creating sequences that combine multiple body parts. This variation is particularly effective for kinesthetic learners and adds novelty to familiar counting routines.
Environmental Sounds: Take rhythm activities outdoors or around the learning space. Count bird chirps, footsteps while walking, bounces of a ball, or taps on different surfaces. This helps children understand that rhythm and counting exist everywhere in their environment, not just in structured music time.
Cultural Rhythms: Introduce counting songs and clapping games from different cultures. This expands children’s musical vocabulary while exposing them to diverse rhythmic patterns and counting systems. Many cultures have rich traditions of hand-clapping games that combine mathematical concepts with social play.
Visual Pattern Cards: Create cards showing rhythm patterns visually (e.g., three red circles followed by two blue circles). Children clap the pattern while counting each element, then identify the total number. This strengthens the connection between visual representation and physical/auditory experience.
Tempo Variations: Practice the same counting pattern at different speeds. Start slowly, gradually increase tempo, then slow down again. This develops tempo awareness and helps children understand that while speed changes, the numerical relationship remains constant.
Addressing Common Challenges
Even with well-planned activities, educators and parents commonly encounter certain challenges when implementing rhythm-based counting activities with young children. Understanding how to navigate these obstacles ensures continued progress and maintains positive learning experiences.
Challenge: Inconsistent participation or attention
Solution: Young children have naturally fluctuating attention spans. Rather than forcing participation, create an environment where children can observe and join when ready. Some children need to watch several times before feeling comfortable participating. Offer choices: “Would you like to clap, shake the bells, or just listen today?” Autonomy increases engagement.
Challenge: Children counting without rhythm or rhythm without counting
Solution: The coordination of counting and clapping simultaneously requires significant cognitive resources. Break the task into components: first establish the rhythm through clapping only, then add counting without clapping, then combine them. Use visual cues like bouncing a ball or swaying to help children see the beat, making it easier to coordinate speech and movement.
Challenge: Wide developmental ranges in group settings
Solution: Design activities with multiple entry points. While advanced children count to ten, younger ones can count to three. While some create complex patterns, others can maintain a steady beat. Pair older children with younger ones occasionally, as teaching others reinforces learning. Celebrate each child’s participation at their level rather than comparing achievements.
Challenge: Difficulty maintaining steady tempo
Solution: Use external rhythmic supports such as a metronome app, recorded music with a clear beat, or your own steady patting on legs to provide an auditory anchor. Children naturally rush when excited, so model calmness and use phrases like “let’s make our claps nice and even, like a clock: tick-tock-tick-tock.”
Challenge: Children becoming overstimulated or silly
Solution: Rhythmic activities energize children, which is wonderful but can escalate. Intersperse active clapping with calming activities. Use dynamic contrast intentionally: “That was LOUD clapping! Now let’s try whisper clapping—so quiet we can barely hear it!” End sessions with slow, gentle movements to bring energy levels down before transitioning.
Integrating Clap & Count Into Your Curriculum
Rhythm-based counting activities shouldn’t exist in isolation but rather weave naturally throughout your daily routine and broader curriculum. This integration reinforces learning through repetition in varied contexts and helps children understand that mathematical concepts apply everywhere.
Transition Times: Use counting claps during transitions between activities. “Let’s clap and count to five, then it’s time to wash hands!” This serves the dual purpose of teaching math while managing classroom flow. Children become accustomed to using rhythm and counting as organizational tools.
Story Time Integration: When reading books, pause to clap and count elements in illustrations. “I see three butterflies on this page! Let’s clap for each one: one, two, three!” This connects literacy with numeracy and makes story time more interactive.
Outdoor Play: Incorporate counting and rhythm into physical activities. Count jumps on a trampoline, clap for each child who successfully completes an obstacle course challenge, or create rhythmic chants for playground games. This embeds mathematical thinking into gross motor play.
Meal and Snack Times: Practice counting food items with rhythmic elements: “Let’s count our apple slices! Clap for each one!” This makes routine moments educational without feeling forced or artificial.
Music and Movement Sessions: Dedicate specific time to more elaborate rhythm and counting activities, building on the foundation established in casual daily integration. These focused sessions allow for deeper exploration of complex concepts and give children the message that music and math are important, valued parts of their day.
The holistic approach to early childhood development at The Music Scientist recognizes that true learning happens when concepts are reinforced across multiple contexts and experiences. Whether through structured programs or everyday interactions, combining rhythm with mathematics creates joyful, effective learning that respects each child’s developmental journey while preparing them for future academic success.
Mathematics doesn’t have to begin with worksheets and rote memorization. For our youngest learners, the pathway to numerical understanding runs through rhythm, movement, and joyful participation. When we clap and count together, we’re not just teaching children numbers—we’re showing them that learning can be playful, that their bodies are powerful tools for understanding the world, and that mathematics is a natural, accessible language available to everyone.
The lesson plans and activities outlined in this guide provide a structured yet flexible framework for introducing early math concepts through rhythm. By respecting developmental stages, incorporating multisensory experiences, and maintaining the element of play, we create learning environments where mathematical thinking flourishes naturally. Children who experience math through clapping, singing, and moving build not only computational skills but also confidence, creativity, and a genuine love for learning.
Remember that every child’s journey is unique. Some will immediately sync their claps with counting, while others will need many exposures before the coordination clicks. Some will enthusiastically participate from the first activity, while others will observe quietly for weeks before joining. All of these responses are normal, valuable, and part of the rich tapestry of early childhood development. Your role is to provide consistent, joyful opportunities and celebrate each small step forward.
As you implement these clap and count activities with the young learners in your life, trust the process. The neural pathways being formed, the patterns being recognized, and the mathematical foundations being laid may not produce immediately visible results, but they are profoundly shaping how these children will approach learning for years to come. Through rhythm, you’re giving them one of education’s most powerful gifts: the understanding that learning is something they can do with confidence, creativity, and joy.
Ready to Nurture Your Child’s Love for Music and Learning?
Discover how The Music Scientist’s developmentally-focused programs combine rhythm, movement, and early math concepts to support your child’s cognitive development through the power of music.
Table Of Contents
- Understanding Sound Waves: The Foundation of Music
- Why Smartphone Apps Make Perfect Sound Wave Explorers
- Essential Apps for Sound Wave Experiments
- Experiment 1: Visualizing Sound Frequencies
- Experiment 2: Pitch Recognition and Musical Notes
- Experiment 3: Measuring Decibel Levels and Volume
- Experiment 4: Sound Reflection and Acoustics
- Experiment 5: Exploring Harmonics and Overtones
- Connecting Sound Science to Early Music Education
- Safety Considerations for Young Learners
Have you ever wondered what makes a piano sound different from a violin, or why your toddler’s voice carries across the entire room? The answer lies in the fascinating world of sound waves—invisible vibrations that create every musical note, spoken word, and environmental sound we experience. At The Music Scientist, we believe that understanding the science behind music deepens appreciation and enhances learning, especially during those crucial early developmental years.
Thanks to modern technology, exploring sound waves no longer requires expensive laboratory equipment. Your smartphone, already in your pocket, contains sophisticated sensors and processing power that transform it into a portable sound science laboratory. With the right apps, you can visualize sound waves, measure frequencies, analyze pitch accuracy, and conduct experiments that would have required thousands of dollars of equipment just a decade ago.
Whether you’re a parent curious about the science behind our music enrichment programs, an educator looking to add hands-on activities to your curriculum, or simply someone fascinated by the intersection of music and science, this guide will introduce you to practical sound wave experiments you can conduct using free or affordable smartphone apps. These experiments not only demonstrate fundamental acoustic principles but also illuminate why music is such a powerful medium for early childhood development.
Sound Wave Experiments
Your Smartphone is a Portable Science Lab!
🎵 What You’ll Discover
Transform your smartphone into a sophisticated acoustic laboratory. Visualize invisible sound waves, measure frequencies, analyze pitch accuracy, and conduct experiments that once required thousands of dollars of equipment—all with free apps!
5
Hands-On Experiments
20Hz-20kHz
Human Hearing Range
FREE
Most Apps Are Free
5 Essential Experiments to Try
1
Visualizing Sound Frequencies
See invisible sound waves on your spectrum analyzer—compare voices, instruments, and household sounds
2
Pitch Recognition & Musical Notes
Discover the mathematical relationships that make music harmonious—each octave doubles the frequency!
3
Measuring Decibel Levels
Understand safe volume levels and protect young ears—sounds above 85 dB can damage hearing
4
Sound Reflection & Acoustics
Explore how different materials absorb or reflect sound—create standing waves and hear the Doppler effect
5
Exploring Harmonics & Overtones
Understand why a piano sounds different from a violin—it’s all in the harmonic fingerprint!
📱 Essential App Categories
📊
Spectrum Analyzers
🎼
Pitch Detectors
🔊
Decibel Meters
🎵
Tone Generators
🎓 Why This Matters for Early Learning
🧠 Brain Development
Rich harmonic content stimulates multiple neural pathways, supporting cognitive growth during critical early years
🗣️ Language Skills
Pitch discrimination skills directly support phonological awareness—a critical precursor to literacy
🎯 Motor Coordination
Rhythm and timing activities coordinate auditory processing with motor planning for holistic development
🔬 Key Scientific Concepts Explained
FREQUENCY
Measured in Hertz (Hz), determines pitch—higher frequencies create higher-pitched sounds
AMPLITUDE
Relates to volume—larger amplitudes produce louder sounds
TIMBRE
Tone quality that makes instruments sound unique—determined by harmonic content
HARMONICS
Integer multiples of fundamental frequency that create rich, complex musical tones
🎵 Ready to Explore Sound Science?
These experiments reveal why music is such a powerful learning medium. Understanding the science behind sound enriches musical experiences and supports holistic development during critical early years.
💡 Download a spectrum analyzer app today and start making the invisible visible!
Understanding Sound Waves: The Foundation of Music
Before diving into experiments, it’s helpful to understand what sound waves actually are. When an object vibrates—whether it’s a guitar string, a drum membrane, or your vocal cords—it creates disturbances in the surrounding air molecules. These disturbances travel outward in waves, much like ripples spreading across a pond when you drop a stone into water. When these waves reach our ears, our brains interpret them as sound.
Sound waves have several key characteristics that determine what we hear. Frequency, measured in Hertz (Hz), determines the pitch of a sound—higher frequencies create higher-pitched sounds. Amplitude relates to volume or loudness, with larger amplitudes producing louder sounds. Timbre or tone quality is what makes different instruments sound unique, even when playing the same note at the same volume. Understanding these properties helps explain why the carefully composed music in our Scouts program creates such effective learning experiences for young children.
The human ear can typically detect frequencies ranging from about 20 Hz to 20,000 Hz, though this range diminishes with age. Young children often have particularly sensitive hearing, which is why early exposure to quality musical experiences during programs like Tenderfeet can be so impactful. The smartphone experiments we’ll explore help make these invisible phenomena visible and tangible, bridging the gap between abstract scientific concepts and real-world musical experiences.
Why Smartphone Apps Make Perfect Sound Wave Explorers
Modern smartphones contain remarkably sophisticated microphones capable of capturing a wide range of frequencies with impressive accuracy. Combined with powerful processors that can perform real-time audio analysis, your phone becomes a versatile scientific instrument. Unlike traditional oscilloscopes or spectrum analyzers that cost hundreds or thousands of dollars, smartphone apps provide accessible entry points into acoustic science for everyone.
These apps offer several advantages for educational purposes. They provide instant visual feedback, which is particularly valuable when working with young learners who respond well to multiple sensory inputs—a principle that underpins our approach at The Music Scientist. The interactive nature of smartphone apps engages the kinesthetic learning style, allowing children to see immediate cause-and-effect relationships between their actions (singing, clapping, playing an instrument) and the visual representations on screen.
Furthermore, smartphone-based experiments can be conducted anywhere—at home, in the classroom, outdoors, or even during music lessons. This flexibility makes sound wave exploration an ongoing discovery process rather than a one-time demonstration. Parents whose children participate in our Groovers program can extend learning at home by exploring the acoustic properties of the movements and sounds their toddlers create during classes.
Essential Apps for Sound Wave Experiments
Before beginning your experiments, you’ll want to download a few key applications. Here are the most useful categories and some recommended options for both iOS and Android platforms:
Spectrum Analyzers and Visualizers:
- Spectroid (Android): A free, real-time audio spectrum analyzer that displays frequencies with excellent detail
- Audio Kit (iOS): Provides multiple visualization modes including waveforms and spectrograms
- Sonic Tools SVM (iOS/Android): Combines spectrum analysis with additional measurement capabilities
Frequency and Pitch Detection Apps:
- Tuner – gStrings (Android): Originally designed for instrument tuning, excellent for precise frequency measurement
- Cleartune (iOS): Professional-grade chromatic tuner with detailed frequency readouts
- Pano Tuner (iOS/Android): Visual tuner with real-time frequency display
Decibel Meters and Sound Level Apps:
- Decibel X (iOS/Android): Calibrated sound level meter with recording capabilities
- Sound Meter (Android): Simple, accurate dB measurement with graphing functions
- NIOSH Sound Level Meter (iOS/Android): Professional-grade app from the National Institute for Occupational Safety and Health
Tone Generators and Oscillators:
- Frequency Sound Generator (Android): Produces pure tones at specified frequencies
- Tone Generator (iOS): Creates sine, square, and sawtooth waves for testing
- Signal Generator (iOS/Android): Multi-function audio signal generator
Most of these apps are free or offer free versions with sufficient functionality for educational experiments. We recommend downloading at least one app from each category to have a complete toolkit for the experiments that follow.
Experiment 1: Visualizing Sound Frequencies
This foundational experiment helps make the invisible world of sound waves visible, creating an engaging demonstration that even young children can appreciate and understand.
What You’ll Need:
- Smartphone with a spectrum analyzer app installed
- Various sound sources (musical instruments, voice, household objects)
- Quiet space to minimize background noise
Step-by-Step Process:
1. Set Up Your Spectrum Analyzer – Open your spectrum analyzer app and familiarize yourself with its display. Most apps show frequency on the horizontal axis (typically from 20 Hz to 20,000 Hz) and amplitude or intensity on the vertical axis. Some apps use color gradients to represent intensity levels.
2. Create a Baseline Reading – In a quiet room, observe what background noise looks like on your spectrum analyzer. You’ll likely see low-level activity across various frequencies—this is the ambient sound floor. Understanding this baseline helps you distinguish intentional sounds from environmental noise.
3. Produce Pure Tones – Using a tone generator app on a second device (or a musical instrument like a piano), produce single notes at different pitches. Watch how each note creates a distinct peak at its fundamental frequency. A middle C on a piano (approximately 262 Hz) should create a prominent spike at that frequency, along with additional peaks at harmonic intervals.
4. Compare Different Sound Sources – This is where the experiment becomes truly fascinating. Have someone sing the same note that you played on the piano, and observe how the spectrum differs. While both may share the same fundamental frequency, the distribution of overtones and harmonics creates the unique timbral signature that distinguishes a voice from a piano.
5. Explore Complex Sounds – Try clapping, speaking, or tapping objects while watching the spectrum analyzer. Notice how complex sounds like speech or percussion create patterns across many frequencies simultaneously, unlike the simpler patterns from pure tones or sustained musical notes.
Learning Applications: This experiment beautifully demonstrates why the carefully selected instruments and vocal qualities in programs like our SMART-START English curriculum matter so much. Different timbres stimulate different neural pathways, and the rich harmonic content of quality musical instruments provides more complex auditory input that supports cognitive development.
Experiment 2: Pitch Recognition and Musical Notes
Understanding pitch and frequency relationships forms the foundation of musical literacy. This experiment helps demonstrate the mathematical relationships that make music sound harmonious or dissonant.
What You’ll Need:
- Smartphone with a pitch detection or tuner app
- Musical instrument (piano, guitar, recorder, or any pitched instrument)
- Optional: second device with tone generator
Step-by-Step Process:
1. Calibrate Your Understanding – Open your pitch detection app and familiarize yourself with musical note names and their corresponding frequencies. Standard concert pitch places A4 (the A above middle C) at 440 Hz. Understanding this reference point helps you navigate the entire musical spectrum.
2. Map the Musical Scale – Play each note of a C major scale (C, D, E, F, G, A, B, C) and record the frequency readings. You’ll discover that each note corresponds to a specific frequency, and the mathematical relationships between these frequencies create the familiar sound of a scale. This concrete data makes abstract musical concepts tangible.
3. Explore Octave Relationships – Play the same note name in different octaves (for example, C2, C3, C4, C5) and observe that each octave represents a doubling of frequency. Middle C (C4) vibrates at approximately 262 Hz, while C5 vibrates at about 524 Hz—exactly twice as fast. This perfect mathematical relationship explains why octaves sound so similar despite their different pitches.
4. Test Vocal Pitch Accuracy – Sing or hum various pitches and use the app to see how accurately you can match target notes. This exercise demonstrates the remarkable precision of the human voice and explains why vocal activities form such an important component of our music enrichment programs. Even young children can begin developing pitch awareness through playful exploration.
5. Investigate Microtones and Tuning – If you have access to an instrument that allows pitch bending (like a violin or the human voice), explore the frequencies between standard musical notes. This reveals that Western music divides the octave into specific increments, but infinite frequencies exist between any two notes.
Learning Applications: This experiment illuminates why consistent pitch modeling matters in early childhood music education. When educators in our programs sing with accurate pitch, they’re providing neural templates that help children develop their own pitch perception and production abilities—skills that extend far beyond music into language acquisition and auditory processing.
Experiment 3: Measuring Decibel Levels and Volume
Understanding sound intensity helps create appropriate acoustic environments for learning and protects hearing health—especially important considerations when working with young children’s sensitive ears.
What You’ll Need:
- Smartphone with a calibrated sound level meter app
- Various sound sources at different volumes
- Different room environments (if possible)
- Notebook for recording measurements
Step-by-Step Process:
1. Understand the Decibel Scale – The decibel (dB) scale is logarithmic, meaning each increase of 10 dB represents a tenfold increase in sound intensity. A whisper might measure around 30 dB, normal conversation around 60 dB, and a crying baby can reach 110 dB. Sounds above 85 dB can potentially damage hearing with prolonged exposure.
2. Measure Everyday Sounds – Create a sound level inventory of common household and classroom activities. Measure the volume of speaking voices at different distances, musical instruments, household appliances, outdoor environments, and typical classroom activities. This data provides valuable context for understanding acoustic environments.
3. Test Distance Relationships – Select a consistent sound source and measure its volume at increasing distances (1 meter, 2 meters, 4 meters, 8 meters). You’ll observe that sound intensity decreases predictably with distance, following the inverse square law. This explains why positioning matters so much in classroom and performance settings.
4. Compare Room Acoustics – Produce the same sound (like a handclap) in different environments—a small bathroom, a carpeted bedroom, a large open room, outdoors. Notice how reflective surfaces increase perceived volume while absorptive materials (carpets, curtains, acoustic panels) reduce it. This demonstrates why room selection and treatment matter for optimal learning environments.
5. Map Dynamic Range – If you have access to a musical instrument or audio system, explore the range from the softest sound you can produce to the loudest. This dynamic range varies dramatically between instruments and environments, affecting how music can be expressively performed and perceived.
Learning Applications: These measurements inform the carefully calibrated acoustic environments we create in our programs. Understanding appropriate volume levels ensures that musical activities stimulate and engage without overwhelming sensitive young ears—a balance that’s crucial for the positive, nurturing learning environment central to The Music Scientist’s approach.
Experiment 4: Sound Reflection and Acoustics
Sound waves interact with their environment in fascinating ways, bouncing off surfaces, being absorbed by materials, and creating the acoustic character of different spaces.
What You’ll Need:
- Smartphone with spectrum analyzer and sound level meter apps
- Various reflective surfaces (walls, mirrors, metal sheets, hardcover books)
- Various absorptive materials (blankets, pillows, foam, cardboard)
- Consistent sound source (handclap, tone generator, or small speaker)
Step-by-Step Process:
1. Establish a Baseline Measurement – In an open area away from walls, produce your test sound and measure both the frequency spectrum and the decibel level. This provides your reference point for comparison.
2. Test Reflective Surfaces – Position various hard, smooth surfaces near your sound source and microphone. Observe how reflective materials create secondary sound waves that arrive at the microphone slightly delayed, potentially creating constructive or destructive interference patterns. Certain frequencies may become amplified while others diminish.
3. Explore Absorption – Surround your sound source with soft, porous materials and repeat your measurements. Notice how absorptive materials reduce overall sound levels and particularly affect higher frequencies, which have shorter wavelengths and are more easily absorbed than lower frequencies.
4. Create Standing Waves – In a room with parallel walls, position yourself equidistant from two walls and have someone produce sustained tones at various frequencies. Move slowly toward one wall while watching your spectrum analyzer. At certain frequencies and positions, you’ll detect standing waves—points where reflected waves align to create areas of increased or decreased intensity.
5. Investigate the Doppler Effect – While running your spectrum analyzer, have someone walk toward you while playing a sustained tone, then walk away. You should detect slight frequency shifts as the sound source approaches (higher frequency) and recedes (lower frequency). This demonstrates the Doppler effect, the same phenomenon that changes the pitch of a passing siren.
Learning Applications: Understanding acoustic principles explains why the physical environment matters so much for music education. The room acoustics in our learning spaces are carefully considered to ensure that children can clearly perceive rhythmic patterns, pitch relationships, and timbral nuances—all crucial for the multi-sensory learning experiences we provide.
Experiment 5: Exploring Harmonics and Overtones
When musical instruments play a single note, they’re actually producing a complex mixture of frequencies. The fundamental frequency determines the pitch we perceive, but the presence and intensity of harmonics create the unique tonal character of different instruments.
What You’ll Need:
- Smartphone with spectrum analyzer app
- Multiple musical instruments (or access to various sounds)
- Optional: tone generator app with waveform options
Step-by-Step Process:
1. Understand the Harmonic Series – The harmonic series consists of integer multiples of a fundamental frequency. If the fundamental is 100 Hz, the harmonics appear at 200 Hz (2×), 300 Hz (3×), 400 Hz (4×), and so on. These harmonics occur naturally when most musical instruments produce sound.
2. Analyze Pure Tones – Using a tone generator, create a pure sine wave at a specific frequency (try 440 Hz). Examine it with your spectrum analyzer and notice that a pure sine wave produces primarily just the fundamental frequency with minimal harmonic content. This creates a very “clean” but somewhat artificial sound.
3. Compare Different Instruments – Have various instruments play the same pitch (or use recordings if live instruments aren’t available). Analyze each with your spectrum analyzer and observe the dramatically different harmonic distributions. A flute produces relatively few harmonics, creating its pure, clear tone. A violin produces a rich harmonic series. A clarinet emphasizes odd-numbered harmonics, giving it a distinctive hollow quality.
4. Explore Vocal Formants – Have someone sing different vowel sounds on the same pitch while you analyze the spectrum. You’ll discover that vowel sounds are distinguished not by their fundamental frequency but by the emphasis of certain harmonic regions called formants. This explains how we can recognize vowels regardless of who’s singing or what pitch they’re singing.
5. Investigate Percussion Spectra – Analyze non-pitched percussion instruments like drums, shakers, or hand claps. Unlike pitched instruments with clear harmonic relationships, percussion often produces inharmonic spectra—complex collections of frequencies without simple mathematical relationships. This complexity gives percussion instruments their distinctive character.
Learning Applications: The harmonic richness of live music and quality recordings provides vastly more cognitive stimulation than simple, harmonically-poor sounds. This is why our programs at The Music Scientist emphasize originally composed music performed with quality instrumentation—we’re providing young brains with acoustically rich environments that support multiple aspects of development simultaneously.
Connecting Sound Science to Early Music Education
Understanding the acoustic principles revealed through these smartphone experiments deepens our appreciation for why music is such a powerful educational medium, particularly during early childhood. When toddlers in our Happyfeet program move to music, they’re not just having fun—they’re processing complex acoustic information that stimulates neural development across multiple domains.
The frequency discrimination skills revealed in pitch detection experiments relate directly to language development. Before children can produce different speech sounds accurately, they must first perceive the subtle frequency differences between phonemes. Musical activities that develop pitch awareness simultaneously support phonological awareness—a critical precursor to literacy. This connection explains why our SMART-START Chinese program effectively integrates tonal language learning with musical activities.
The rhythm and timing aspects of sound waves connect to motor development and executive function. When children synchronize movements to musical beats, they’re coordinating auditory processing with motor planning—skills that transfer to countless daily activities from handwriting to sports. The temporal precision required to perceive and produce rhythmic patterns strengthens attention, working memory, and impulse control.
The harmonic complexity revealed in spectrum analysis demonstrates why acoustic quality matters. Rich, harmonically complex sounds provide more information for developing brains to process, creating more neural connections and supporting more robust auditory processing abilities. This understanding guides our instrument selection, recording quality, and acoustic environment design throughout all our programs.
Safety Considerations for Young Learners
While sound wave experiments are generally safe, several important considerations ensure positive experiences, especially when involving young children in these explorations.
Hearing Protection: Young children’s ears are more sensitive than adults’, and damage from excessive volume is permanent. When conducting experiments involving sound level measurements, avoid exposing children to sounds above 85 dB for extended periods. Use the decibel meter to monitor and maintain safe volumes. If exploring louder sounds briefly for educational purposes, minimize duration and consider hearing protection.
Frequency Considerations: While most smartphone speakers can’t produce dangerously loud volumes, be cautious when using external speakers or amplification. Very high frequencies (above 15,000 Hz) that many adults can no longer hear may be uncomfortable or even painful for children. Similarly, very low frequencies at high volumes can cause physical discomfort.
Screen Time Balance: While these smartphone-based experiments provide valuable learning experiences, remember to balance screen-based exploration with direct musical experiences. The apps are tools for understanding, but they shouldn’t replace the tactile, social, and full-body experiences of making music together—the foundation of programs like Groovers.
Age-Appropriate Involvement: Younger children can observe and participate in simple cause-and-effect demonstrations (“Watch what happens when I sing!”), while older preschoolers might begin to understand basic concepts like “high and low sounds.” Adjust complexity and duration to match developmental stages and attention spans.
Creating Positive Associations: Frame these experiments as playful exploration rather than formal testing. The goal is to nurture curiosity and wonder about the invisible world of sound, not to create pressure or anxiety. When children associate science and music with joy and discovery, they develop intrinsic motivation for continued learning.
The invisible world of sound waves surrounds us constantly, creating the rich acoustic tapestry that our brains interpret as music, speech, and environmental sounds. Through these smartphone-based experiments, we can make this hidden realm visible and tangible, transforming abstract concepts into concrete, observable phenomena. Whether you’re visualizing the harmonic complexity of a piano chord, measuring the acoustic properties of different rooms, or tracking the precise pitch of a child’s developing singing voice, these experiments reveal the remarkable science underlying every musical experience.
For parents and educators, understanding these acoustic principles enriches our appreciation for why music education matters so profoundly during early childhood. Every carefully composed melody in our programs, every intentionally selected instrument, every acoustically optimized learning environment—these design choices rest on the scientific foundations you’ve explored through these experiments. Music isn’t just culturally valuable or emotionally meaningful; it’s a precisely structured acoustic phenomenon that engages developing brains in uniquely powerful ways.
The beauty of smartphone-based sound exploration is that it’s never finished. Each experiment opens doors to new questions, new observations, and deeper understanding. As your children grow and develop through programs at The Music Scientist, you can revisit these experiments at increasing levels of sophistication, watching both their musical abilities and their scientific thinking mature together. Sound science and music education aren’t separate domains—they’re complementary lenses for understanding how vibrations become meaning, how physics becomes beauty, and how carefully structured acoustic experiences nurture young minds.
Experience the Science of Music with Your Child
Ready to see how scientific understanding enhances musical learning? The Music Scientist’s developmentally-focused programs combine acoustic excellence with age-appropriate activities that nurture your child’s cognitive, motor, and social development. From sensory-rich experiences for babies to structured preschool readiness programs, we transform sound science into joyful learning.
Contact us today to learn more about our programs and discover how music can unlock your child’s full potential.
Table Of Contents
- Why Building a Drum Pad Together Matters
- Developmental Benefits of Musical STEM Projects
- What You’ll Need
- Understanding the Basics Together
- Step-by-Step Building Guide
- Making It Musical: Customization Ideas
- Troubleshooting Common Challenges
- Extending the Learning Experience
Imagine your child’s eyes lighting up as they tap a homemade drum pad and hear the beat they’ve created—not from a store-bought toy, but from a musical instrument they built with their own hands. Building a DIY Arduino drum pad with your child isn’t just about creating a functional instrument; it’s about opening a world where music meets technology, where curiosity leads to discovery, and where parent-child bonding happens through shared creation.
In today’s digital age, children are naturally drawn to interactive technology, but too often they remain passive consumers rather than active creators. This project transforms that relationship, giving young learners the opportunity to understand how the devices around them actually work while exploring rhythm, sound, and musical expression. For parents seeking meaningful activities that combine education with entertainment, an Arduino drum pad project offers the perfect blend of STEM learning and artistic expression.
Whether your child is already enrolled in structured music programs or you’re looking to complement their early musical education at home, this hands-on project provides valuable kinesthetic and logical learning experiences. Best of all, you don’t need to be a tech expert or a musician to succeed—just a willingness to learn alongside your child and celebrate the creative process together.
Why Building a Drum Pad Together Matters
When you embark on a DIY Arduino drum pad project with your child, you’re doing much more than assembling electronic components. You’re creating a multisensory learning experience that engages their natural curiosity while building essential skills for the future. Unlike passive screen time or pre-assembled toys, this project requires active problem-solving, fine motor coordination, and creative thinking—all while producing something genuinely useful and fun.
The beauty of building musical instruments lies in the immediate feedback loop they provide. Your child can see the direct results of their efforts: press a sensor, hear a sound. This cause-and-effect relationship is fundamental to early cognitive development and helps children understand that they have the power to create and control their environment. When children experience this kind of agency—knowing that their actions produce meaningful outcomes—it builds confidence that extends far beyond the project itself.
Moreover, collaborative building projects strengthen parent-child relationships in unique ways. Working together on a challenge creates shared moments of frustration, problem-solving, and eventual triumph. These experiences become cherished memories and establish patterns of teamwork and mutual support that benefit your relationship for years to come. You’re not just building a drum pad; you’re building trust, communication skills, and a shared vocabulary around learning and creating.
Developmental Benefits of Musical STEM Projects
Combining music with technology creates a uniquely powerful learning environment that engages multiple intelligences simultaneously. When your child works on an Arduino drum pad, they’re exercising kinesthetic intelligence through hands-on construction, logical-mathematical intelligence through understanding circuits and cause-effect relationships, musical intelligence through rhythm exploration, and verbal intelligence as they discuss the process and ask questions.
This multi-faceted engagement mirrors the approach taken in comprehensive early childhood music programs like Scouts, which fosters a love for science through catchy melodies. Just as quality music education integrates various learning domains, building a musical instrument brings together disparate skills into one cohesive, meaningful experience. Children naturally make connections between concepts when they’re presented in integrated, hands-on contexts rather than isolated lessons.
From a developmental perspective, projects like these support several critical areas of growth. Fine motor skills develop as children manipulate small components, connect wires, and adjust sensors. Executive function skills—including planning, sequencing, and following multi-step instructions—get substantial practice throughout the building process. Spatial reasoning improves as children visualize how components fit together and how the finished product will function. These cognitive benefits complement the musical and creative dimensions of the project, creating rich learning opportunities that support overall development.
What You’ll Need
Before diving into your Arduino drum pad adventure, gather all the necessary materials and tools. Having everything ready beforehand keeps the project flowing smoothly and maintains your child’s engagement throughout the process.
Essential Components
- Arduino Uno board – The brain of your drum pad that processes inputs and creates sounds
- Piezo sensors (4-6 pieces) – These detect vibrations when tapped, turning physical drumming into electrical signals
- 1 MΩ (1 megaohm) resistors – One for each piezo sensor to stabilize the electrical signal
- Breadboard – A reusable platform for connecting components without soldering
- Jumper wires – For making connections between components
- USB cable – To connect your Arduino to a computer
- Computer with Arduino IDE software – Free software for programming your drum pad (downloadable from arduino.cc)
- Speaker or headphones with 3.5mm jack – For hearing your drum sounds
- Foam or rubber pads – To create comfortable striking surfaces (can use mouse pads, craft foam, or rubber coasters)
- Cardboard or wooden base – To mount your drum pads securely
Optional But Helpful
- Hot glue gun or strong adhesive tape for securing components
- Decorative materials (paint, markers, stickers) to personalize your drum pad
- Small project box to house the Arduino and wiring neatly
- Additional drum sound samples if you want to customize beyond basic sounds
Most of these components can be purchased as Arduino starter kits, which often provide better value than buying items separately. Expect to spend between $30-$60 for all materials, creating an affordable entry point into musical electronics that provides hours of engagement and learning.
Understanding the Basics Together
Before jumping into construction, take time to explore the key concepts with your child. This foundational understanding transforms the project from following instructions to genuine comprehension, making the experience more meaningful and educational.
Start by examining the piezo sensor, which is the magic component that turns drumming into digital information. Explain that when you tap the sensor, it vibrates, and these vibrations create a tiny electrical current—like how their voice creates vibrations in the air that we hear as sound. This sensor is detecting vibrations and turning them into a signal the Arduino can understand. Let your child hold the sensor and tap it gently, helping them connect the physical action with the technological function.
Next, introduce the Arduino board as the “brain” that makes decisions. When the Arduino receives a signal from the piezo sensor, it has to decide: “Was that tap strong enough to count as a drum hit? Which sound should I play?” This is similar to how their own brain processes information—when they touch something hot, their brain quickly decides to pull their hand away. The Arduino follows instructions (code) just like they follow instructions when playing games or helping with chores.
The breadboard and wires are like roads that let information travel between different parts of the drum pad. Just as they might travel from home to school on different streets, electrical signals travel along wires to get from one component to another. The breadboard makes it easy to create these connections without any permanent changes, which means you can experiment and adjust things as you learn.
This conceptual foundation helps children develop systems thinking—understanding how individual parts work together to create something greater than the sum of its components. This cognitive skill applies far beyond electronics, supporting everything from understanding ecosystems in science to analyzing stories in literature.
Step-by-Step Building Guide
Now comes the exciting part—bringing your drum pad to life! Work through these steps together, encouraging your child to handle components (under your supervision) and make decisions about the design. Remember, the goal is learning and bonding, not perfection, so embrace mistakes as valuable learning opportunities.
Phase 1: Preparing Your Drum Pads
1. Create the striking surfaces – Cut your foam or rubber material into circles about 3-4 inches in diameter. These will be the “drums” that your child actually hits. Involve your child in deciding sizes and shapes—perhaps they want one large pad and several smaller ones to create different tones. This decision-making process engages their creative and spatial reasoning abilities.
2. Attach piezo sensors – Using hot glue or strong tape, secure one piezo sensor to the underside of each foam pad, centered so it will detect vibrations from any angle. Explain to your child that the sensor needs to be firmly attached so it vibrates along with the pad when struck. Let them test the connection by pressing gently on the pad and feeling how the sensor moves with it.
3. Prepare your base – Arrange your drum pads on a cardboard or wooden base in a layout that feels comfortable for your child’s hands. Consider their natural reach and hand size when spacing the pads. This is an excellent opportunity to discuss ergonomics—how tools and instruments should fit the person using them. Once you’ve found the perfect arrangement, mark the positions and secure the pads to the base.
Phase 2: Building the Circuit
4. Set up your breadboard – Place your breadboard near the Arduino board. Show your child how the breadboard has rows of connected holes that make it easy to join components together. Insert the Arduino’s ground (GND) wire into the breadboard’s negative rail—this will be the common ground for all your sensors.
5. Connect the first piezo sensor – Take the wire from one piezo sensor and connect it to an analog input pin on the Arduino (start with A0). Connect the other wire from that same sensor to the ground rail on your breadboard. Now add a 1 megaohm resistor between the analog pin and ground. This resistor acts like a traffic controller, keeping the electrical signal stable and preventing false triggers. Walk through this connection slowly with your child, naming each component as you work.
6. Repeat for additional sensors – Connect each additional piezo sensor to its own analog input pin (A1, A2, A3, etc.), following the same pattern: sensor to analog pin, sensor to ground, resistor between pin and ground. This repetition helps reinforce the pattern and builds your child’s confidence as they see the circuit taking shape. Encourage them to make the physical connections under your guidance, developing their fine motor skills and spatial awareness.
7. Double-check all connections – Before moving to programming, carefully verify that each sensor is properly connected. Create a simple checklist with your child: “Piezo connected to A0? Check. Resistor in place? Check.” This teaches important quality control habits and helps prevent frustration later.
Phase 3: Programming Your Drum Pad
8. Install Arduino IDE – If you haven’t already, download and install the free Arduino IDE software from the official Arduino website. Open the program together and explore its interface briefly. Point out the text area where code goes, and the buttons for uploading code to the Arduino. This demystifies programming and makes it less intimidating.
9. Load or write the drum code – For beginners, start with a simple sketch (Arduino’s term for programs) that reads the piezo sensors and plays different tones through the computer’s speakers. The basic logic is straightforward: read the sensor value, if it’s above a certain threshold (meaning someone hit the drum), play a sound. You can find beginner-friendly drum pad code in the Arduino community forums or project repositories. As you review the code together, explain the basic structure: “This part tells the Arduino which pins we’re using. This part listens for drum hits. This part makes the sound.”
10. Upload and test – Connect your Arduino to the computer via USB cable, select the correct board and port in the Arduino IDE, and upload your code. This is a moment of excitement—will it work? When your child taps a pad and hears a sound, their face will likely light up with pride and amazement. Celebrate this achievement together! If it doesn’t work immediately, treat it as a detective game: “Let’s figure out what’s happening and fix it together.”
11. Adjust sensitivity – Experiment with the threshold values in your code to adjust how hard someone needs to tap to trigger a sound. Too sensitive, and every tiny vibration creates noise; too insensitive, and you have to hit very hard. Finding the right balance involves trial and error, which teaches persistence and iterative improvement—key aspects of both scientific thinking and musical practice, much like the patient skill-building found in programs for toddlers exploring music and dance.
Making It Musical: Customization Ideas
Once your basic drum pad is functional, the real creative fun begins. Customizing the instrument allows your child to express their musical personality and deepen their understanding of how different sounds create different feelings and rhythms.
Assign different drum sounds to each pad – Instead of all pads making the same tone, program each one with a different sound: bass drum, snare, hi-hat, cymbal. This creates a more realistic drum kit experience and introduces your child to the distinct roles different drums play in creating rhythm. Discuss how the deep bass drum provides the heartbeat of music, while the sharp snare adds accent and energy. This conversation connects the technical project to musical concepts and appreciation.
Create rhythm patterns together – Challenge your child to recreate simple rhythm patterns you demonstrate, or encourage them to invent their own beats. This turns the drum pad into a genuine musical instrument rather than just a tech toy. You might even record their creations and play them back, which provides powerful positive reinforcement and creates a sense of accomplishment. These musical interactions support the same rhythmic awareness and pattern recognition developed in quality early childhood music programs.
Decorate and personalize – Let your child paint, draw, or decorate the drum pads and base. They might want to color-code pads by sound (red for bass, blue for snare), create a theme (dinosaur drums, space drums, rainbow drums), or simply add their favorite colors and designs. This artistic customization makes the instrument truly theirs and integrates visual arts into the project, creating an even richer learning experience.
Experiment with materials – Try different striking surfaces to hear how materials affect sound. A foam pad produces a different response than a rubber one, which differs from cardboard covered in fabric. These experiments introduce basic concepts of acoustics and material science while keeping the activity playful and hands-on.
Troubleshooting Common Challenges
Even with careful construction, you’ll likely encounter some hiccups along the way. Approach these challenges as learning opportunities rather than failures, modeling problem-solving strategies that will serve your child throughout life.
If the drum pad doesn’t respond to taps: First, check that all physical connections are secure—loose wires are the most common culprit. Verify that each piezo sensor is properly connected to both an analog pin and ground, and that resistors are in place. Open the Arduino IDE’s serial monitor (a tool that shows you what the Arduino is “seeing”) and watch the values as you tap pads. If numbers change when you tap, the sensors are working but your threshold might need adjustment in the code.
If sounds trigger randomly without tapping: Your circuit is probably too sensitive or picking up environmental vibrations. Try increasing the threshold value in your code, ensuring all connections are firm (loose connections can create false signals), and placing the drum pad on a stable surface away from other vibration sources. Adding small pieces of foam underneath the base can help isolate it from table vibrations.
If one pad works but others don’t: This usually indicates an issue with specific connections rather than the overall code. Systematically check each non-working pad’s wiring, comparing it to the working one. This methodical troubleshooting approach teaches logical problem-solving and helps children understand that complex problems can be broken down into smaller, manageable parts.
If sounds are delayed or choppy: This might be a computer processing issue rather than an Arduino problem. Close other programs to free up computer resources, or consider adding an external speaker module to your Arduino so sound production doesn’t depend on computer performance. This introduces concepts of system resources and optimization.
Remember, every challenge overcome builds resilience and confidence. When your child sees that problems can be solved through patient investigation and adjustment, they develop a growth mindset that extends far beyond this project.
Extending the Learning Experience
Your DIY Arduino drum pad is just the beginning of a rich learning journey. Use this foundation to explore related concepts and activities that deepen understanding and maintain engagement over time.
Explore rhythm and music theory – Use your drum pad to introduce basic musical concepts like tempo, rhythm patterns, and time signatures. Create simple games: “Can you tap a pattern four times in a row exactly the same?” or “Let’s make a rhythm that matches your heartbeat.” These activities develop temporal awareness and mathematical thinking while keeping music playful and accessible. Children who build instruments often develop a deeper appreciation for music because they understand the mechanisms behind sound production.
Connect to formal music education – If your child is engaged in structured music programs like enrichment classes for toddlers or preschool readiness programs, this DIY project beautifully complements those experiences. The hands-on understanding of rhythm and sound production reinforces concepts introduced in formal classes, while the creative freedom of a homemade instrument provides an outlet for independent musical exploration. Discuss what they’re learning in music class and how it relates to their drum pad—making these connections strengthens retention and understanding across contexts.
Document the journey – Take photos or videos throughout the building process and of your child’s musical performances. Create a simple project journal where your child can draw pictures of what they built, write (or dictate) what they learned, and record their favorite drum patterns. This documentation serves multiple purposes: it creates a cherished memory, reinforces learning through reflection, develops literacy and communication skills, and gives your child something to share with family members or at school show-and-tell.
Expand into other STEM projects – Success with the drum pad can lead to other Arduino projects: light-up instruments, simple games, weather stations, or motorized creations. Each project builds on previous knowledge while introducing new concepts, creating a progressive learning pathway. The confidence gained from completing one challenging project motivates children to tackle the next, establishing a pattern of curiosity-driven learning that can last a lifetime.
Join maker communities – Look for local maker spaces, library programs, or online communities where your child can share their creation and see what others have built. This social dimension of making introduces collaboration, inspiration from peers, and the understanding that learning happens in communities. Seeing other children’s projects sparks new ideas and demonstrates that there are many ways to approach creative challenges.
Building a DIY Arduino drum pad with your child creates far more than a functional musical instrument—it opens pathways to understanding technology, music, problem-solving, and creative expression. Through this hands-on project, your child experiences the profound satisfaction of creating something useful with their own hands while developing cognitive, motor, and social-emotional skills that support growth across all areas of development.
The skills practiced during this project—following multi-step instructions, understanding cause-and-effect relationships, persisting through challenges, and expressing creativity—are the same foundational abilities that support success in formal education and beyond. When children learn that they can understand and even create technology rather than simply consuming it, they develop confidence and agency that shapes how they approach challenges throughout life.
Most importantly, the time spent working together on this project strengthens your parent-child relationship through shared challenges, discoveries, and achievements. These collaborative experiences create lasting memories and establish patterns of learning together that can continue as your child grows. Whether your child goes on to pursue music, technology, or entirely different interests, the message of this project remains powerful: with curiosity, patience, and creativity, you can bring your ideas to life.
As you tap out rhythms together on your homemade drum pad, you’re not just making music—you’re nurturing a young mind’s potential and demonstrating that learning is an adventure best shared between people who care about each other.
Nurture Your Child’s Musical Journey with Expert Guidance
While DIY projects at home spark creativity and exploration, structured music education provides the developmental foundation that helps young children thrive. At The Music Scientist, we specialize in age-appropriate music programs that integrate movement, sensory play, and cognitive development for children from infancy through preschool.
Our programs are designed to complement and enhance the musical curiosity you’re nurturing at home, providing expert guidance that follows developmental milestones while making learning joyful and engaging. From infant sensory development classes to comprehensive preschool readiness programs, we use music as a powerful medium to develop your child’s full potential.
Ready to support your child’s complete developmental journey?Contact us today to learn more about our programs and discover how professional music education can complement the creative exploration you’re doing at home.
Table Of Contents
- Understanding Special-Needs Music Therapy
- Government Subsidies for Music Therapy
- Private Scholarships and Grants
- Community-Based Financial Assistance
- Navigating the Application Process
- Developmental Benefits of Music Therapy
- Case Studies: Success Stories
- Additional Resources for Parents
For parents of children with special needs, discovering the transformative power of music therapy can be a pivotal moment in their child’s developmental journey. The structured, sensory-rich environment of music therapy sessions offers unique benefits for children with various developmental challenges, from autism spectrum disorders to sensory processing difficulties. However, the financial aspect of accessing these specialized services often becomes a significant barrier for many families.
In Singapore, a network of financial support options exists specifically designed to make special-needs music therapy accessible to all children who could benefit from it. These range from government subsidies and programs to private scholarships and community-based initiatives. Navigating these options, however, can sometimes feel overwhelming for parents already managing the complex needs of their children.
This comprehensive guide aims to demystify the process of securing financial assistance for special-needs music therapy in Singapore. We’ll explore the various subsidy schemes, scholarship opportunities, application procedures, and essential documentation required, helping you find the right support to unlock the benefits of music therapy for your child’s unique developmental path.
Understanding Special-Needs Music Therapy
Special-needs music therapy is a clinical and evidence-based practice that uses music interventions to address the specific developmental, emotional, cognitive, and physical needs of children with disabilities or developmental delays. Unlike conventional music lessons, music therapy for special needs children is conducted by trained therapists who tailor each session to target particular developmental goals.
Music therapy works by engaging multiple sensory systems simultaneously, creating neural pathways that support development in areas where children may be experiencing challenges. For children with autism spectrum disorders, music therapy can help with communication skills and social interaction. Children with sensory processing disorders often benefit from the structured auditory input, while those with physical disabilities may see improvements in motor skills and coordination through rhythmic activities.
The effectiveness of music therapy stems from music’s unique ability to bypass certain cognitive barriers, allowing children to connect and engage in ways that traditional therapeutic approaches might not achieve. This is particularly relevant for children who struggle with verbal communication or conventional learning methods – music becomes their alternative language for expression and development.
At The Music Scientist, our developmental approach to music education recognizes these principles, incorporating elements that support multiple intelligences and learning styles, making our programs particularly adaptable for children with various developmental needs.
Government Subsidies for Music Therapy
Singapore’s government offers several subsidy schemes that can help offset the cost of special-needs music therapy for eligible children. Understanding these options is crucial for accessing the financial support available to your family.
Early Intervention Programme for Infants and Children (EIPIC) Subsidies
The EIPIC provides support for children with developmental needs from birth to six years of age. While traditionally focused on broader early intervention services, some EIPIC centers incorporate music therapy as part of their holistic approach. Subsidies are means-tested, with monthly household income determining the subsidy amount families receive.
Eligible families can receive subsidies ranging from 30% to 95% of the program fees. For lower-income households, additional support may be available through the Enhanced EIPIC Subsidy. These subsidies can significantly reduce the financial burden of accessing specialized developmental programs that include music therapy components.
Disability Support Programme (DSP)
For school-aged children (7-18 years), the DSP offers subsidies for intervention services, which can include music therapy when prescribed as part of the child’s intervention plan. This scheme operates through approved service providers and offers tiered subsidy rates based on household income.
Parents should note that accessing DSP subsidies typically requires a formal diagnosis and recommendation from a healthcare professional, highlighting music therapy as a beneficial intervention for the child’s specific condition or developmental needs.
Community Health Assist Scheme (CHAS)
While CHAS primarily covers medical treatments, some families have successfully used CHAS benefits for certain therapeutic interventions when prescribed by healthcare providers. In specific cases where music therapy is recommended as a treatment component for conditions like autism or developmental delays, CHAS subsidies might apply at participating institutions.
The application for CHAS is straightforward and can be completed online, with subsidy cards valid for two years before renewal is required. The blue, orange, and green tiers offer different subsidy levels based on household income and home value.
Private Scholarships and Grants
Beyond government assistance, various private organizations in Singapore offer scholarships and grants specifically designed to support children with special needs in accessing therapies, including music therapy.
SG Enable Grants
As Singapore’s dedicated agency for disability support, SG Enable administers several funding schemes that can help with the cost of specialized interventions. The Assistive Technology Fund and Care and Support Schemes sometimes cover music therapy when it’s part of a comprehensive developmental plan.
SG Enable also periodically offers specific grants in partnership with private donors that target creative arts therapies, including music therapy. These opportunities are typically announced on their website and through partner organizations working with special needs communities.
Foundation and Corporate Scholarships
Several foundations in Singapore provide educational grants that include therapeutic interventions for children with special needs. The Lien Foundation, AWWA, and the Singapore Children’s Society occasionally offer funding for specialized programs that demonstrate clear developmental benefits.
Corporate scholarship programs, often part of corporate social responsibility initiatives, represent another potential funding source. Companies like Singapore Airlines, DBS, and OCBC have established foundations that provide educational support for children with special needs, which may include therapeutic interventions like music therapy when appropriate documentation of need is provided.
Community-Based Financial Assistance
Community organizations play a vital role in bridging financial gaps for families seeking special-needs music therapy. These localized support systems often provide more personalized assistance and flexibility in their funding criteria.
Religious Organizations and Community Centers
Many religious organizations in Singapore maintain welfare funds to assist community members in need. Churches, temples, mosques, and gurdwaras often have discretionary assistance programs that can help cover therapeutic interventions for children with special needs. These funds typically require a simple application process through the organization’s social service office.
Community centers and Family Service Centers across Singapore also administer local assistance schemes that can help with the cost of developmental programs, including music therapy. These neighborhood-based resources often have good knowledge of additional support options and can help connect families with relevant funding sources.
Crowdfunding and Community Fundraising
For families facing significant financial constraints, crowdfunding platforms like Give.asia and Ray of Hope Initiative offer avenues to raise funds specifically for therapeutic interventions. These platforms allow families to share their child’s story and specific needs with a broader community willing to contribute.
Community fundraising events organized through schools, parent support groups, or special needs advocacy organizations can also generate targeted funding for children requiring music therapy. These grassroots efforts often succeed because they connect donors directly with beneficiaries in their community.
Navigating the Application Process
Successfully securing financial assistance for special-needs music therapy requires proper documentation and a strategic approach to the application process. Understanding what evaluators are looking for can significantly improve your chances of approval.
Essential Documentation
Most subsidy and scholarship applications require a comprehensive set of documents to establish both financial need and the therapeutic necessity of music therapy. These typically include:
- Medical diagnosis or developmental assessment report from a qualified healthcare provider
- Recommendation letter specifically mentioning music therapy as a beneficial intervention
- Income verification documents (recent tax assessments, pay slips, CPF statements)
- Cost quotation from the music therapy provider
- Treatment plan outlining specific goals and expected outcomes
Having these documents organized and readily available streamlines the application process and demonstrates your preparedness to funding organizations. For parents with children participating in programs at The Music Scientist, our administrative team can assist with preparing program-specific documentation that clearly articulates the developmental benefits.
Application Timeline and Strategy
Most funding programs operate on specific application cycles or have limited funds available each year. Research application deadlines and submission requirements well in advance to ensure you don’t miss crucial opportunities. For government subsidies, applications can typically be submitted year-round, but private scholarships often have defined application windows.
Consider applying to multiple funding sources simultaneously rather than sequentially. This parallel approach increases your chances of securing assistance and potentially combining partial funding from different sources. Keep detailed records of all applications submitted, including contact information for follow-up inquiries.
Developmental Benefits of Music Therapy
Understanding the specific developmental benefits of music therapy can strengthen your case when applying for financial assistance. Research-backed evidence of effectiveness is particularly persuasive to funding organizations evaluating applications.
Music therapy offers multifaceted benefits for children with special needs. The rhythmic structure of music supports improvements in motor planning and coordination, while melodic elements enhance language development and communication skills. For children with autism spectrum disorders, music therapy has shown particular promise in developing joint attention, social engagement, and emotional regulation.
Programs like our Groovers and Scouts classes at The Music Scientist incorporate elements that naturally support these developmental areas. Our curriculum design thoughtfully integrates movement, rhythm, and sensory experiences that engage multiple learning pathways – particularly beneficial for children with diverse developmental profiles.
When documenting the need for music therapy in funding applications, focus on how these specific developmental benefits address your child’s particular challenges. Personalized goals with measurable outcomes make a compelling case for the therapeutic necessity of music intervention.
Case Studies: Success Stories
Real-life examples of children who have benefited from subsidized music therapy can provide both inspiration and practical insights for families beginning this journey. These case studies illustrate different pathways to securing financial assistance.
Ming’s Journey: Combining Multiple Funding Sources
Seven-year-old Ming, diagnosed with autism spectrum disorder, showed significant communication challenges and sensory sensitivities. His parents successfully combined partial funding from three sources: a basic government subsidy, a supplementary grant from a private foundation, and a modest contribution from their family service center. This layered approach covered the full cost of his weekly music therapy sessions.
The key to Ming’s funding success was his parents’ detailed documentation of his specific needs and the targeted outcomes expected from music therapy. After six months, Ming showed measurable improvements in verbal communication and reduced sensory sensitivities, particularly in group settings – progress that helped secure continued funding.
Aisha’s Experience: School-Based Program Access
Aisha, a five-year-old with developmental delays, accessed music therapy through her preschool’s partnership with a specialized provider. Her parents successfully advocated for EIPIC subsidies to cover most of the program cost, with the school’s financial aid fund covering the remaining portion.
The collaborative approach between Aisha’s healthcare provider, school, and parents created a strong case for funding. Regular progress reports documenting improvements in her attention span and social interaction skills helped justify the continued financial support for her music therapy sessions.
Additional Resources for Parents
Beyond direct financial assistance, several resources in Singapore can help parents navigate the journey of accessing and maximizing the benefits of music therapy for their special needs children.
Parent Support Networks
Connecting with other parents of children with special needs provides invaluable emotional support and practical advice. Groups like the Autism Resource Centre, Dyslexia Association of Singapore, and SPD maintain active parent networks where information about funding opportunities is regularly shared. Many of these organizations also offer workshops on securing financial assistance for therapeutic interventions.
Online communities and forums specific to Singapore, such as the Special Needs Singapore Facebook group, serve as informal but highly effective information exchanges where parents share tips on recently available grants, scholarship opportunities, and successful application strategies.
Professional Guidance Services
Social workers and case managers at hospitals, special education schools, and family service centers can provide professional guidance on available financial assistance. These professionals often have extensive experience with various funding applications and can offer valuable insights on preparing compelling documentation.
Some therapy providers, including specialized music schools like The Music Scientist, offer consultation services to help parents understand which programs would best benefit their child’s specific developmental needs. Our SMART-START programs, available in both English and Chinese, incorporate developmentally supportive elements that complement therapeutic goals for many children with special needs.
Accessing financial assistance for special-needs music therapy in Singapore requires persistence, thorough documentation, and strategic planning, but the developmental benefits for your child make these efforts worthwhile. The landscape of available subsidies and scholarships continues to evolve as awareness grows about the effectiveness of music therapy for children with diverse developmental needs.
Remember that combining multiple funding sources often provides the most comprehensive coverage. Government subsidies can form the foundation, supplemented by private scholarships, community assistance, and, when needed, personal fundraising efforts. Throughout this process, documenting your child’s progress and the specific benefits they gain from music therapy strengthens future funding applications.
Most importantly, view securing financial assistance as an ongoing journey rather than a one-time effort. As your child grows and their needs evolve, different funding opportunities may become relevant. Staying connected with support networks and regularly researching new programs ensures you’re aware of all available options to support your child’s developmental journey through the transformative power of music therapy.
At The Music Scientist, we understand the unique challenges and joys of nurturing children with diverse developmental needs. Our specialized programs incorporate elements that naturally support multiple developmental pathways through music, movement, and sensory engagement. If you’d like to learn more about how our developmental music programs might benefit your child or need assistance with documentation for subsidy applications, we’re here to help. Contact us today to schedule a consultation with our experienced team.